Amsterdam is an amazing city loaded with canals and bars. Indeed one of the major tourist attractions is the Red Light District, an area loaded with a high density of bars. Through necessity, the ingenious outdoor solution has evolved over the years for outdoor Amsterdam Urinals.
Note: This post may contain affiliate links. Please read our disclosure policy for more information.
— Олександр H͎a͎p͎p͎y͎-͎G͎o͎-͎L͎u͎c͎k͎y͎ 🌅 (@ua_freeman) October 23, 2022
17 Remarkable Facts About Amsterdam Urinals
Pissour is the Dutch term for Urinal.
Wild Peeing (Wild Plassen in Dutch) is the term used for urinating in the canal or against a building/tree. For this reason, Wild Plassen is the whole reason Amsterdam Urinals exist, well the outdoor type anyway.
Each year an average of 8 people die from peeing into an Amsterdam Canal. As a result, some 400 ambulances per year are called out for people who fell into a canal in Amsterdam. Hence there is such a fuss about public urinals in Amsterdam. The humble Amsterdam Urinal saves lives!
Wild Peeing can cost you up to a €90 fine if caught by the police, you may even be detained for your trouble. In short, you should have used the outdoor Amsterdam Urinals.
If you walk into a bar and ask to use a toilet, you will likely be refused or asked to pay up to € 1. Note that bars will typically charge € 0.50 even for paying patrons.
Victims of wild peeing are easy to spot, their dead bodies have their flies open when they’re removed from the canal.
Some of the oldest brick Pissours in Amsterdam are centuries old.
The latest Pissours are high-tech metal ones that descend beneath the pavement during the day and are raised at night.
Amsterdam has installed the first high-tech metal female public urinal in the Netherlands.
As someone with a small bladder, I found the sidewalk urinals in Amsterdam to be awesome. https://t.co/LtVoSu4KyI
Toilets also are called WC in the Netherlands, pronounced ‘Way Say’ in Dutch.
de Krul (meaning “the curl”), is the nickname of the curved Pissour of Amsterdam, which has been around since 1880.
There is an ingenious initiative in place in Amsterdam to turn Pissour waste into fertilizer.
Quadruple Pissours
Newer plastic pissours have been around for about a decade, and usually accommodate 4 men at once.
Original design pissours were all metal and drained straight into the canals. However, newer designs are plastic and drain into the wastewater system.
Red Light District
There are 3 de Krul pissours in the main Red Light District, 1 in the Singelgebied Red Light District, and 1 in De Pijip Red Light District.
Amsterdam has a total of 35 public urinals for men and 3 for women.
It is possible to purchase disposable cardboard tubes in Amsterdam pharmacies to allow women to pee standing up, using the men’s pissours.
Amsterdam has these public urinals on its streets (weird, i know) but I stood at one for a good minute thinking it was a water fountain only to give up and watch a man immediately rip a pee right where I had just held my bottle. And an obvious fountain was feet away, of course pic.twitter.com/7p8yNsp1oI
Given these points, you are now somewhat of a Amsterdam Outdoor Urinal Expert. When you are in Amsterdam keep an eye out for the very unique outdoor Amsterdam Urinals. In other words, no Wild Plassen, and use the de Kurls! One last tip: be ready for the strong stench if you are ever privileged enough to use this fine contraption.
Would you like a free copy of our Ultimate Bucket List?
Not sure where to travel to next? We have created the Ultimate Bucket List to help you plan your next trip. 1170 awesome travel destinations in 167 countries. And we want you to have it for FREE.
Capturing video with a GoPro in low light conditions is challenging to say the least. You have definite limitations due to the smaller image sensors used in GoPro cameras. But with a bit of knowledge and practice, you can definitely improve the quality of your footage. Here are 11 tips for GoPro in low-light situations to get you started.
Note: This post may contain affiliate links. Please read our disclosure policy for more information.
Is GoPro Good for Low Light?
The image sensor is the main issue with GoPro cameras when it comes to low light. This is the number 1 determining factor for how pleasing low-light videos and photos turn out. The bigger the image sensor, the better quality photos, and videos are shot in low light.
DSLR cameras excel in low-light footage. For example, an entry Nikon D5300 DSLR camera is equipped with a 23.5 x 15.6 mm CMOS image sensor. Move up the Nikon range to the D750 and the CMOS image sensor is a whopping 35.9 x 24.0 mm. That’s a seriously big image sensor that will give you amazing low-light photos and video.
The GoPro image sensor, on the other hand, has always been 1/2.3″, which translates to 6.3 x 4.7mm. These are only about a quarter the size of the Nikon D5300 DSLR camera. It is true that GoPro image sensors are great in well-lit environments, and that’s what they are designed for. But in low light, GoPro’s produce grainy, noisy images. This is a hardware limitation and cannot be fully fixed, no matter what adjustments you make to the GoPro camera.
The new size for GoPro image sensors with the introduction of the GoPro Hero11 Black is 1/1,9″ with an 8:7 Aspect Ratio. This means your image will be taller than the traditional 4:3 aspect ratio, but will it give better performance in low light? Unfortunately not, the GoPro Hero11 Black still performs similarly to the GoPro Hero10 Black in low light conditions. So you will still need to optimize your GoPro low light settings to get the best shots.
Tips for Using GoPro in Low Light
So now you have the bad news, let’s try to do the best we can with what we’ve got. Here are my best tips to help you capture the very best GoPro video and photos possible in low light conditions.
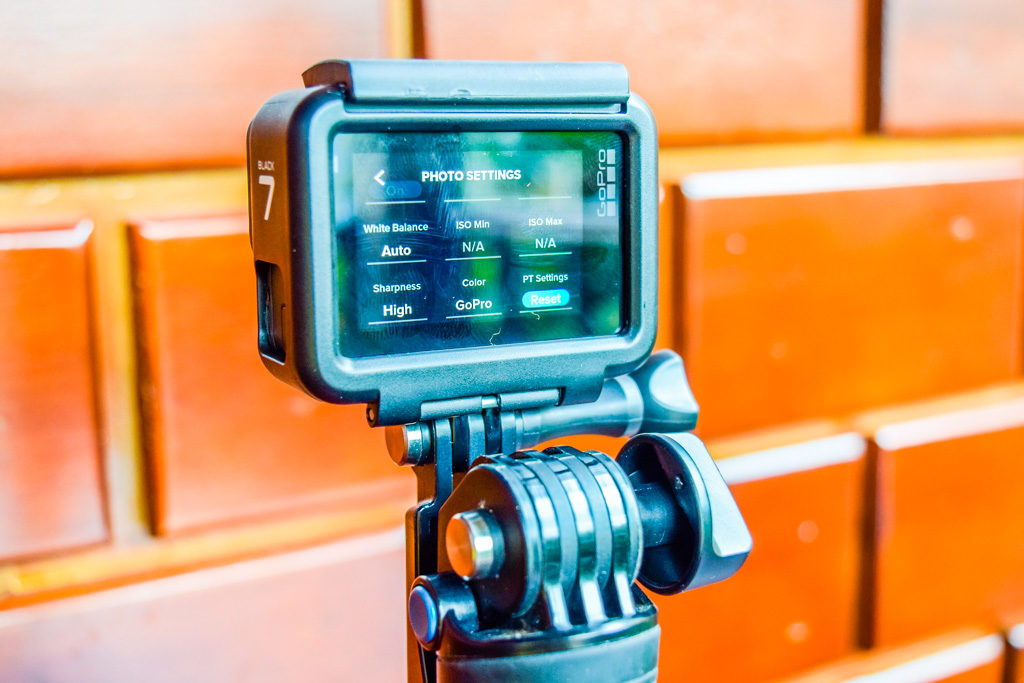
Tip 1 – Turn ProTune ON
Firstly, you will need to turn ProTune ON to enable manual control over the most important GoPro settings. Here are the best ProTune settings for your GoPro low light settings.
Shutter = Auto
EV Compensation = +0.5 for slightly dark or +1.0 for really dark
White Balance = Auto
ISO Min = 400 for slightly dark, 800 for medium-dark, 1600 for very dark
ISO Max = 800 for medium-dark, 1600 for very dark
Sharpness = Medium
Color = Flat
Raw Audio = Off
Pro Tip: To lock the ISO value onto a specific value, set the ISO min and ISO max to the same value.
Protune Menu
Typically the ISO will be either 800 or 1600 for low light, 800 is preferable. If you can get away with lower ISO settings then definitely do it, you will have a less grainy result. This is definitely the most important GoPro low-light setting to get right.
Pro Tip:Rule number 1 in all forms of photography is to use the lowest ISO setting you can get away with. This will help to avoid noisy photos/videos.
Tip 2 – Lower the Frame Rate
Using a lower frame rate will let more light in, thus decreasing the amount of grain/noise in the footage. 2.7K resolution with 24 frames per second is the preferred resolution/frame rate setting for low light. Note that you will have to set your aspect ratio to 16:9 to use 2.7K resolution.
If you wish to use a 4:3 aspect ratio, you may choose 1080P x 24 frames per second. This aspect ratio is, of course, personal preference. Personally, I prefer 16:9, which is the standard YouTube size.
Tip 3 – Increase the Resolution
Nighttime is the perfect time to increase your resolution. Go all the way, to 4k if you like. Your footage will definitely come out better than using a lower resolution like 1080P. Definitely do not under any circumstance go lower than 1080P.
Tip 4 – Have a Test Run
It is important to have a test run to check your results, especially if you have a one-off event to video or photograph. Try to match the exact light conditions, then record the video or photo. Check the results on a large screen like an iPad or computer.
You may have to tweak either the EV Compensation or the ISO Maximum settings. Try to make these settings as low as possible without making the footage too dark because lower settings will reduce the amount of grain or noise. Keep tweaking and checking until you get the best GoPro low light footage possible under the conditions.
Tip 5 – Use iPhone Screen to Remote Control GoPro
It’s a little hard to see exactly what’s going on with the GoPro by viewing the LCD GoPro screen, it’s just too darn small. The easy solution is to connect your GoPro wirelessly to your iPhone via the GoPro app.
Not only can you see what’s going on in greater detail, but you can also easily tweak the most important low-light GoPro settings such as ISO and EV Compensation, right from the iPhone via the GoPro app.
Tip 6 – Use Post Production Editing
Your grainy or noisy image can be cleaned up more with good quality software such as Final Cut Pro X. There is a multitude of effects to choose from, but the best I’ve seen is the Noise Reduction effect in Final Cut Pro X. In FCPX you can even combine this with other effects such as sharpness to improve the results further.
Pro Tip: Whatever software you are using, just Google noise reduction using XYZ software to discover the best effects to apply.
Tip 7 – Use a Tripod
A tripod will dramatically clean up your low-light footage. GoPro Stabilization is a wonderful thing, but there have been many tests done that show that GoPro stabilization software messes up your low light footage by adding unwanted noise.
We recommend the GoPro Volta, a battery hand grip, remote control, and tripod all in one. You get about triple the normal GoPro Battery Life, so it is also perfect for low-light time-lapse video.
Pro Tip: Also think about the GorillaPod Video PRO tripod which comes with a GoPro light mount. This way, you can mount a light near your camera to make the scene a little brighter.
Tip 8 – Don’t Be Fooled by LOW LIGHT Mode
You could be forgiven for thinking that Low Light video mode will magically fix your video footage in low light. Wrong! Pretty much all this setting does is decrease the frame rate when the camera is not performing well. In fact, it will only kick in when you’re videoing at 48 fps, 60 fps, or higher.
All Low Light mode does is temporarily decrease the frame rate to 30 frames per second to let more light in. But if you recall Tip 2 – reduce the frame rate to 24 fps. If you follow Tip 2 then the Low light mode will not even work.
Tip 9 – Try Night Lapse Mode
GoPro has a wonderful feature called Night Lapse Photo mode. This a little tricky to master, and you will definitely require a quality tripod to nail it. But it’s definitely worth a shot for some crazy impressive photos. Here’s a GoPro article to explain how to do it.
Tip 10 – Use an External Microphone
Ok, so this is for anyone recording rock concerts, which are generally low-light events. And that is: don’t forget the external microphone! The internal microphones on the GoPro are renowned for being rather ordinary.
By attaching a Rode VideoMicro to your GoPro, your low-light rock concert can become extraordinary. Your video may be a little grainy, but your audio will rock!
Tip 11 – Use Your Feet
OK so this might sound kind of obvious, but sometimes you just need to be prepared to use your feet to move to a brighter location. More light means less noise when it comes to GoPro cameras in low light.
For instance, you might be just a few meters away from a light source like a street lamp. Just by moving your camera location closer to the light source, it is possible to make a remarkable difference to your low-light footage. Just remember to adjust your max ISO and EV compensation to suit (refer to Tip 1).
Bonus Tip #1 – Update Your GoPro
Now for a quick bonus tip. Just like mobile phones, each new GoPro comes with an impressive new set of features. These will undoubtedly improve your GoPro low-light photos and videos. Oh, and don’t forget to update your GoPro firmware too.
The only difference with GoPros is that the image sensors do not see the rapid improvements that you are likely to see with iPhones and other cameras. But the software improvements almost always give you extra features to use.
Bonus Tip #2 – Use the Light Mod and the Media Mod
The light mod is an awesome compact LED Light that attaches to your GoPro via a cold shoe mount, which is found on the Media Mod. This modest little investment will drastically improve your low-light shooting results.
GoPro Limitations
So as you can see, GoPro does have some severe limitations when it comes to low light. Please note that I don’t mean GoPro is not the best low-light action camera, because all action cameras have similar limitations due to small image sensors.
Follow all of the above tips and you might just end up with some reasonable low-light footage. The trick is to allow yourself time to experiment and get used to the EV Compensation and ISO settings. Just realist that, unlike DSLR which seems to have no limit to the awesome quality possible, you do have a definite limit with your GoPro in low light.
GoPro Hero 11 Low Light Settings
There aren’t a lot of groundbreaking improvements in the GoPro Hero 11 low light settings and performance. Here is a detailed clip to explain subtle differences.
GoPro Hero 11 Low Light Settings
Frame rate: 24 fps
Resolution: 4k
Lens: Wide Lens
Hyper smooth: Auto Boost
ProTune Settings:
10-Bit Colour = On
Bit Rate = High
Shutter Speed = Auto
EV Comp = 0
White Balance = Auto
ISO Min = Auto
ISO Max = Auto
Sharpness = Medium
Color = Vibrant
RAW Audio = Off
Wind = Auto
Media Mod = Front (Depends on how you are using the GoPro)
GoPro Printable Cheat Sheet
Click below to download a handy printable GoPro for Beginners Cheatsheet. We’ll give you some quick help on the following:
GoPro frame sizes and resolutions
Frames per second comparison
Field of view comparison
Voice command list
Swipe motions used on GoPro touchscreens
ProTune recommended settings
Time-lapse intervals, recording times, and video lengths
One of the sickest features of GoPro Action Cameras is the ability to operate just by listening to your voice. But it can be a little finicky. Read on to learn all about Mastering GoPro Voice Control.
Note: This post may contain affiliate links. Please read our disclosure policy for more information.
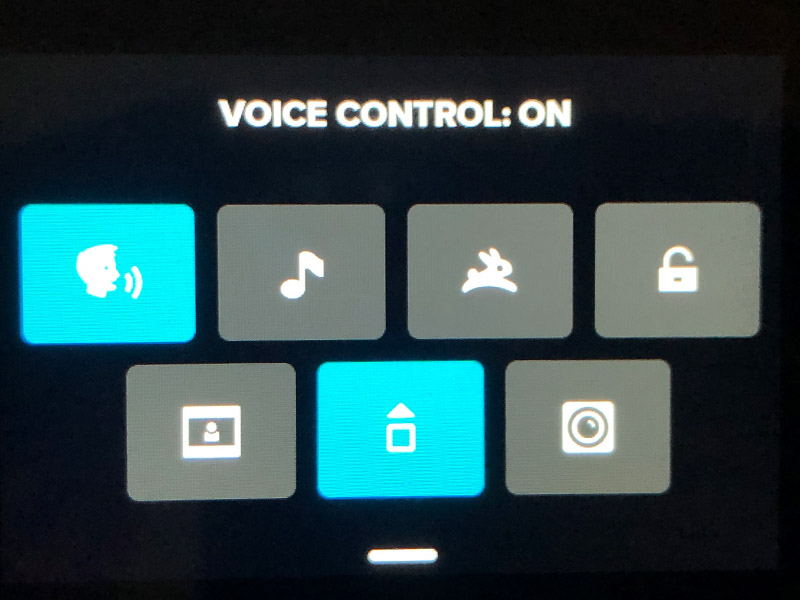
How To Turn On Voice Control
Turning on Voice Control is dead easy by following these instructions:
On the GoPro rear screen, swipe down to access the GoPro Dashboard.
Tap the Voice Control Icon (top left) – It is the picture of a man’s head.
You can disable Voice Control in the same manner.
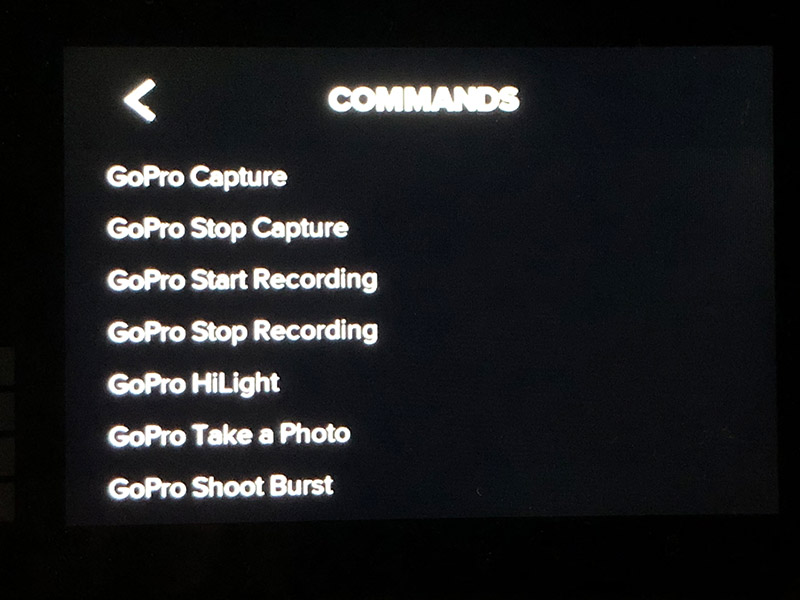
How To See The List Of Commands On Camera
You can see the full list of commands available right there on your GoPro camera, by following these instructions (For GoPro Hero11 Black):
On the GoPro rear screen, swipe down to access the GoPro Dashboard.
Swipe Left to access the Preferences menu.
Select the Preferences button.
Select the Voice Control option.
Select the Commands option.
The full list of available commands for Voice Control will be displayed.
Voice Control Commands for GoPro Hero 9 and Newer
GoPro Capture
GoPro Stop Capture
GoPro Start Recording
GoPro Stop Recording
GoPro HiLight
GoPro Take a Photo
GoPro Shoot Burst
GoPro Start Time Lapse
GoPro Stop Time Lapse
GoPro Turn On (Removed for HERO11 and HERO10 Black)
GoPro Turn Off
GoPro Video Mode
GoPro Photo Mode
GoPro Time Lapse Mode
Commands for GoPro Hero 8 and Older
GoPro Start Recording
GoPro HiLight (Adds a HiLight tag while recording video)
GoPro Stop Recording
GoPro Take a Photo
GoPro Shoot Burst
GoPro Start Time Lapse
GoPro Stop Time Lapse
GoPro Video Mode
GoPro Photo Mode
GoPro Time Lapse Mode
GoPro Burst Mode
GoPro Turn Off
GoPro Turn On (only with HERO8 Black, HERO7 Black, HERO6 Black, & Remo + HERO5 Black)
GoPro Capture (HERO7 cameras only)
GoPro Stop Capture (HERO7 cameras only)
Secret Voice Commands
Try these secret commands which really work!
Oh Shit (Adds a HiLight tag while recording video)
That Was Sick (Adds a HiLight tag while recording video)
Which Languages Do Voice Commands Work In?
English
French
German
Italian
Portuguese
Russian
Spanish
Chinese
Korean
Japanese
Which Models Do Voice Commands Work On?
HERO11 Black
HERO10 Black Bones
HERO10 Black
HERO9 Black
MAX
HERO8 Black
HERO7 (White, Silver, & Black)
HERO6 Black
Fusion
HERO5 Black
HERO5 Session
HERO (2018)
Remo
Talk To Your GoPro
So now it’s time to get out and talk to your GoPro. Tell it what you think (that was sick), and tell it exactly what you want to do.
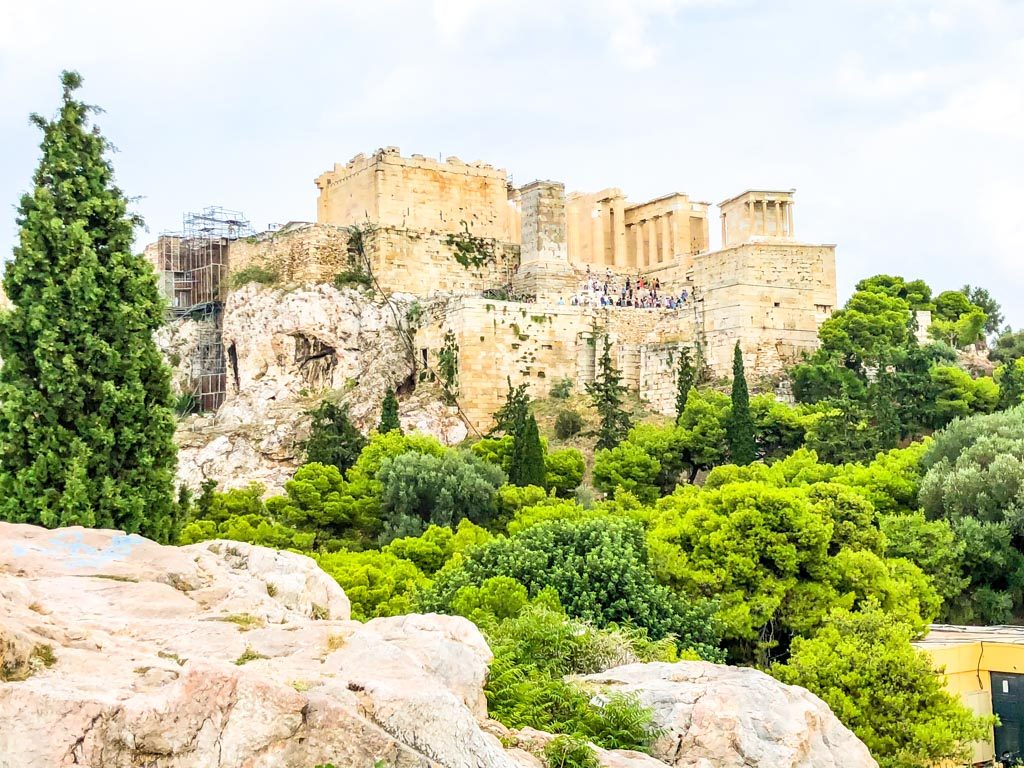
When traveling to Athens, where to stay is a giant dilemma. There are so many great neighborhoods to choose from. If you like great shopping and dining with million-dollar views of the Acropolis, then Monastiraki is for you. If you want the most convenient hotel in Monastiraki with an unbeatable view of the Acropolis, then check out this A is for Athens Hotel Review.
Note: This post may contain affiliate links. Please read our disclosure policy for more information.
Where is A for Athens Hotel
A for Athens Hotel is right next to the Monastiraki metro train station. How convenient! It is also right across the road from Monastiraki Square, a gathering place lined with amazing authentic Greek restaurants, and surrounded by a giant flea market. And it’s a stone’s throw from the best Athens Historic Sites, like Hadrian’s Library and Roman Agora.
If you like to be in the middle of the liveliest area in town, then A for Athens Hotel is for you. This area is buzzing with activity, and it literally never closes. You are just a 1-minute walk away from all manner of shopping, conveniences, and restaurants, which all flank the lively Monastiraki square.
A for Athens Rooftop Bar
The best thing about this hotel is the A for Athens Bar on the rooftop. This bar is very popular with tourists to watch the Acropolis at sunset. The views are stunning and uninterrupted, with beautiful Monastiraki Square in the foreground.
We took 3 attempts to get to the A for Athens Rooftop bar. The elevator works overtime from about 90 minutes before sunset. After waiting for our turn for the elevator, we arrived at the top floor of the Rooftop bar. Then we were politely asked if we had a booking. Then we were politely turned away, which is what happened to most other visitors.
It’s Impossible not to enjoy the Rooftop Bar scenery
So on our third attempt, we did the right thing and made a booking through our hotel reception. All the tables are amazing with uninterrupted views of the Acropolis, so there’s no need to worry about missing out on the view.
A for Athens Cocktail Bar and Restaurant
So the rooftop bar is not just a bar that only serves beer and wine. It also serves a classy selection of cocktails and dining. In fact, I suspect it is the best cocktail bar Athens has to offer. Prices are quite high, but the stunning world-class views of the World Heritage Acropolis make it well worthwhile.
Enjoying Sunset at the Rooftop Restaurant
Breakfast at A for Athens
The best thing about A for Athens is the amazing breakfasts. These are on the same rooftop as the rooftop bar, on a split-level terrace. The views are breathtaking. And the cuisine is equally stunning. This is one of the finest breakfasts I have tried in a hotel. It’s buffet style, and it’s all about healthy eating. The variety is simply amazing.
The dining area is also quite spacious so that even in peak tourist season there is plenty of space for guests. This is nice because we never saw the restaurant crowded, and you are never pressured to leave after dining. Stay as long as you want to soak up the jaw-dropping scenery.
Amazing View at Breakfast
How to Get To A for Athens Hotel
We booked a transfer directly from the Athens International Airport. For convenience, we use the Mozio.com app, where you can select a transfer service from dozens of different options. When you arrive at the airport you are greeted by a Mozio driver holding your name on a sign. How easy is that!
It takes about 40 minutes for the journey, and it’s rather expensive, we paid 40 euros. It is a long way from Athens Airport to Monastiraki. At least with Moz.com, we were not at the mercy of shady taxi drivers.
Alternatively, catch the Metro train from the airport to Monastiraki Station, then you have just a 1-2 minute walk to the hotel which is right across the road.
You could also catch the X95 bus from the airport to Monastiraki Square, which is the cheapest option.
A for Athens is a small intimate hotel
Rooms at A for Athens Hotel
In the reviews we read about some people complaining about the noise coming in from Monastiraki Square through their front window, making it hard to sleep. Some reviews even reported stunning views of the Acropolis from the front window.
Our room had none of these issues. We were in the center of the building with a window facing a service shaft. There was no view at all of Athens or the bustling square. What this meant was the room was eerily quiet. The upside of this was we had some of the best-uninterrupted periods of sleep. The downside was that we had no view.
The room was modern, new, clean, and fresh. No complaints at all about the comfort and quality of the room. Overall it was excellent value for money.
Our Family Room
Conveniences
Here are some of the things I particularly liked about the location of the A for Athens Hotel.
Monastiraki Square
Right across the road is the busy Monastiraki Square. This square is lined by amazing restaurants, with authentic Greek food and music. It’s a wonderful place to go for a nice meal.
Dining Out in Monastiraki Square
Flea Market Shopping
From Monastiraki Square, there is a giant market happening every day. You can buy all manner of souvenirs, clothing, gadgets, jewelry etc. All the regular items that you could find in a regular tourist market.
Part of the Market at Monastiraki Square
Hop-On-Hop-Off Bus
Across the road, there is a bus stop for all the Hop-On-Hop-Off buses. We are a big fan of these buses, they are the most efficient way to get around and see all the major tourist attractions. There are 2 or 3 different bus lines to choose from, and you can purchase tickets online, on the bus, or from the Ticket Seller at the bus stop.
City Sightseeing Bus at the Front of the Hotel
Athens Historic Sites
Behind Monastiraki Square are the first of the major historic sites included in the Combined 7 attraction ticket. These are Hadrian’s Library and Roman Agora. It’s not far to continue walking to visit the Acropolis.
Just a few minutes walk from A for Athens to the Acropolis
Souvenir Shopping
Alongside Hadrian’s Library is a wonderful line of souvenir shops. These are probably the most well-stocked souvenir shops you will find anywhere. The quality of the goods are amazing, and the vendors are always up for a bit of haggling.
Souvenir Shops near the Hotel
Moustaka Toy Shop
Across the road from the Hotel, on the corner of Monastiraki Square is the largest toy superstore we’ve ever seen. 3 floors stocked with every toy imaginable. The prices are reasonable but not cheap. If you are traveling with kids this is a must.
Rooftop Restaurants
OK, so the A for Athens Rooftop Cocktail Bar and Restaurant does have unbeatable views. But it is rather expensive. The good thing is that there are loads of other rooftop restaurants all around, so you are easily able to find a restaurant with more reasonable prices. And get a slightly different view of the amazing Acropolis. You never get tired of that view!
Dining at the Rooftop Restaurant
Safe Area
Sure you need to be wary of pickpockets working in this area. That goes with any major tourist district. But overall we always felt safe in this area. There is always some form of security at Monastiraki Square and the metro train station, so provided you don’t stray too far from the square at night you should be quite safe.
Friendly Staff
The staff is worthy of a mention in this hotel review. All staff was amongst the friendliest, most helpful staff that we have come across. The guys at the front counter were always willing to assist, helping us with taxis and tourist advice on several occasions. With these guys, you will get to experience wonderful Greek charm at its best.
If you are still wondering where to stay in Athens, take my advice and go straight for A for Athens Hotel in Monastiraki. The breakfast views alone will convince you that you made the best choice. And don’t forget to come back for the best cocktail bar Athens has to offer. You won’t regret it.
Would you like a free copy of our Ultimate Bucket List?
Not sure where to travel to next? We have created the Ultimate Bucket List to help you plan your next trip. 1170 awesome travel destinations in 167 countries. And we want you to have it for FREE.
If you’re after the best action camera, GoPro is hands down the best on the market. GoPros are now so advanced that professionals and serious amateurs alike are finding GoPros to be the best wearable action cam on the market. There are now different cameras and models available you need a GoPro Comparison Chart to compare the various GoPro model comparisons.
Note: This post may contain affiliate links. Please read our disclosure policy for more information.
Difference Between GoPros
3 basic product lines exist:
Session is basically a small cube with a lens and button. Also low in cost, and small in size.
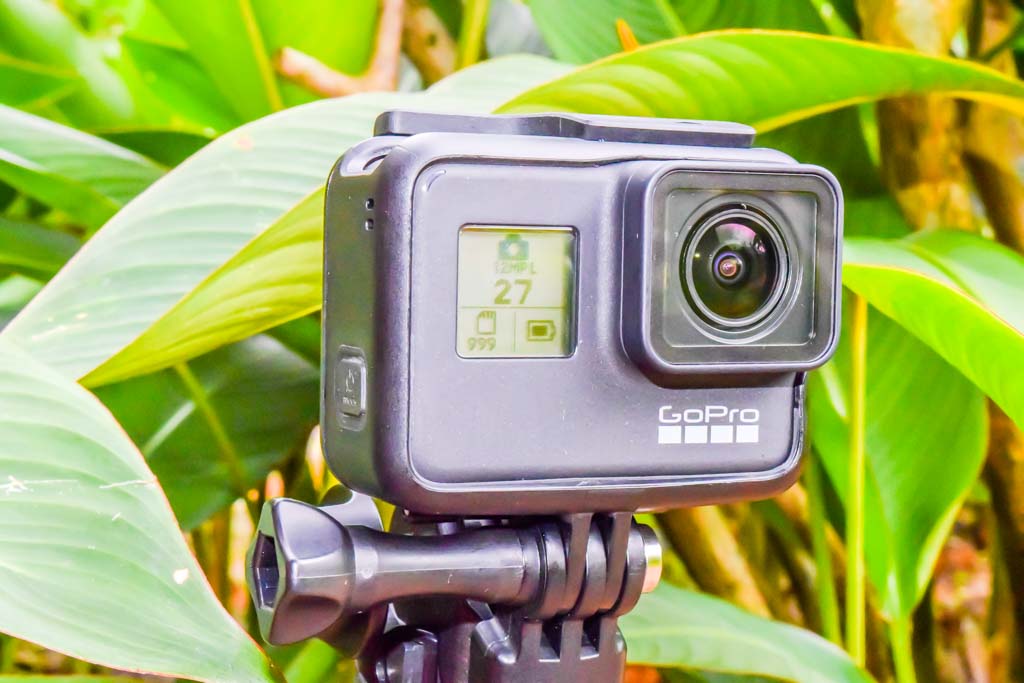
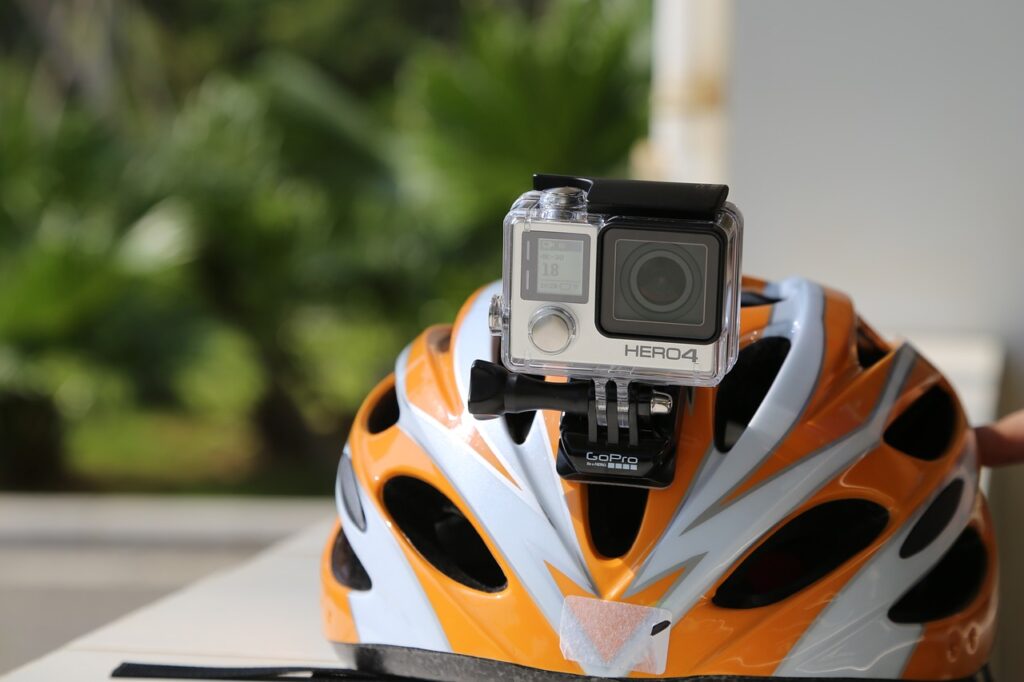
Hero is more like a normal camera with more buttons, a touch screen etc. Hero costs a bit more but has more functionality. The GoPro Hero is by far the most popular GoPro Camera.
Fusion is the newer, much larger 360-degree camera, with a lens on both the front and the back. This 360-degree camera is not the traditional camera style and is certainly not for everyone.
Generally, newer cameras offer big improvements in image quality and frame rates. Upgraded camera models can look almost identical on the outside (take Hero5 Black versus Hero6 Black), but they come with major upgrades ‘on the inside. Sensors, processors, and the like.
Note: For current prices of each model check the Amazon affiliate links at the bottom of this post.
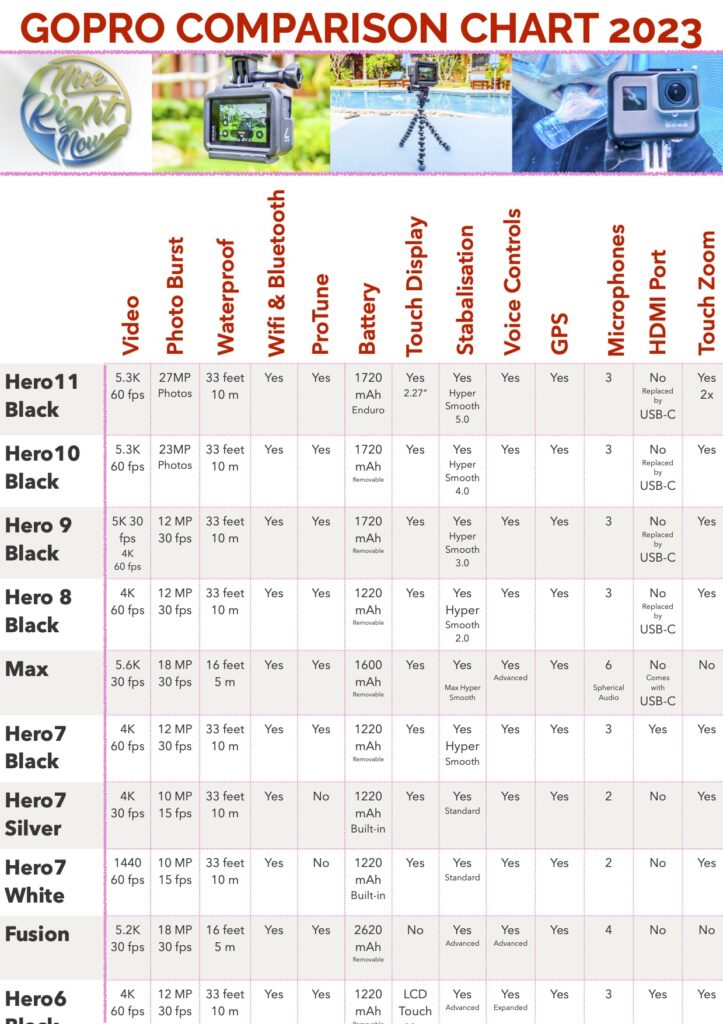
GoPro Comparison Chart
Here is a handy chart to show you the differences between GoPros and the main features of each, of the 10 most popular and recent GoPro models.
If you would like to check more detailed specifications, links for each model are shown below.
If you would like to compare specifications for earlier models, links for each model are shown below.
Compare GoPros
GoPros Rankings from Best to Worst
And here’s a ranking of the cameras from best to worst (and their release dates). This is in relation to image quality, video quality especially full HD and 4k video, and advanced features like voice controls, slow motion, and timelapse.
Flagship Models
Hero11 Black (Sep 2022)
Hero10 Black (Sep 2021)
Hero9 Black (Sep 2020)
Hero8 Black (Oct 2019)
Hero7 Black (Sep 2018)
Max (Oct 2019)
Fusion (Nov. 2017)
High End
Hero7 Silver (Sep 2018)
Hero6 Black (Sep. 2017)
Hero5 Black (Sep. 2016)
Hero5 Session (Sep. 2016)
Hero4 Black (Sep. 2014)
Mid Range
Hero7 White (Sep 2018)
Hero4 Silver (Sep. 2014)
Hero4 Session (Sep. 2014)
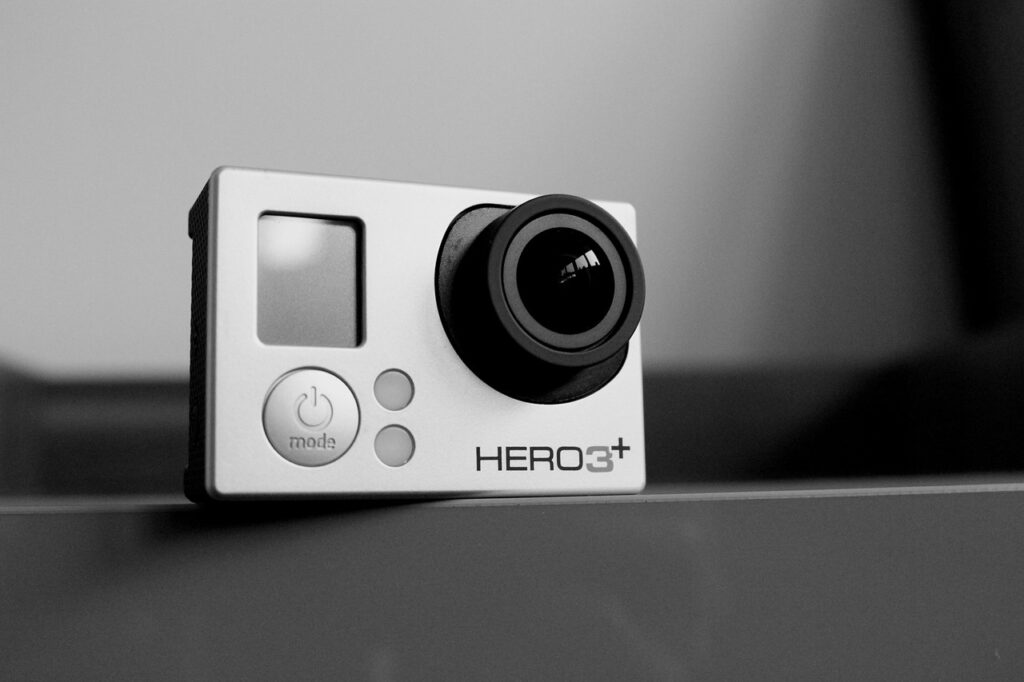
Hero3+ Black (Oct. 2013)
Hero3+ Silver (Oct. 2013)
Hero3 White (Oct. 2013)
Entry Level
Hero (2018)
Hero+ LCD (Jun. 2015)
Hero+ (Oct. 2015)
Hero
Detailed GoPro Comparisons
Here is the GoPro specs comparison for each model, with the most advanced at the top and to least advanced at the bottom. Detailed specs are also provided via links. These highlight the huge variety of GoPro model differences.
Something REALLY BIG happened with the GoPro Hero8. Now you can get GoPro media mods to attach to your GoPro. These are especially good for GoPro Vlogging and include the front-facing screen, light and shotgun microphone. Brilliant!
via Instagram // Asa Butterfield attached his GoPro HERO camera to his skiing helmet. He says by doing that, it convinces others that you’re good at the sport. pic.twitter.com/l2C4RDVYLD
In case you would like to compare prices, and specifications, or even purchase a GoPro, here are Amazon links for each of the above cameras.
Flagship Models
High End
Entry Level
The Final Word on GoPros
So are you still confused about the difference between GoPros? Here is an excellent GoPro camera comparison video by Ben Scmanke of AuthenTech fame. Ben helps to provide you answers to “which GoPro should I get?”
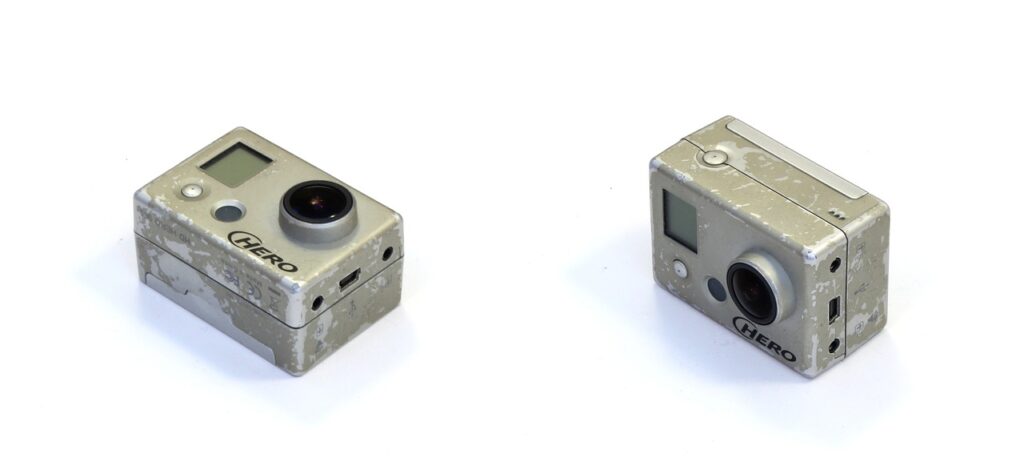
If you own a Hero, Hero+, Hero4, or Hero 5, I recommend you upgrade at least to the awesome Hero7 Black or Hero8 Black. Certainly, this upgrade will blow your mind. Conversely, if you own a Hero6, I recommend you stick with your Hero6. These are perfect to use for travel video cameras.
The differences in GoPros from Hero6 to Hero7 or Hero8 are probably not enough to warrant the expenditure. That is unless you absolutely must have the insanely cool image stabilization of the Hero7 or Hero8.
The Hero6 Black still is a modern GoPro model, but is a bit of a dinosaur compared to the epic GoPro10, with HyperSmooth 4.0, the absolute market leader in video stabilization. Check out the full GoPro Hero comparison chart above to compare GoPro models.
GoPro Hero5 is still an incredibly versatile GoPro model
Would you like a free copy of our Ultimate Bucket List?
Not sure where to travel to next? We have created the Ultimate Bucket List to help you plan your next trip. 1170 awesome travel destinations in 167 countries. And we want you to have it for FREE.
So you’re in the market for a new iPhone. Maybe you’re not sure if it’s time to upgrade yet. Maybe you’re not sure what sure which model to upgrade to. The new flagship iPhones are ridiculously expensive, so you better make sure you need all those features. To help you decide, here is the difference between iPhone cameras & iPhone comparison chart.
Note: This post may contain affiliate links. Please read our disclosure policy for more information.
How Good are iPhone Cameras?
I have personally owned iPhone 1, 3s, 5s, 6 plus, 6s plus, X, XS Max, and iPhone 14 Pro Max. I have noticed all the incremental improvements in the different iPhone cameras. But it was the iPhone 6s Plus that was a game-changer. Resolution increased from 8MP to 12MP. This suddenly turned the iPhone into a serious camera, and it was time to consider using the iPhone as a primary camera.
The problem with the iPhone 6s Plus was that the video footage was ok, but not fantastic. The footage was shaky because there was no video stabilization. That didn’t come out until the iPhone 7. And the sound was awful.
My iPhone XS Max still blows my mind. The camera is a massive improvement over its predecessors. The video quality is astounding, with phenomenal video stabilization. You can actually walk with an iPhone XS Max and record smooth video footage with awesome stereo audio. Am I ready to upgrade to the iPhone 14 Pro? Well, I have done so, and do not regret it. Side-by-side tests are incredible; the iPhone 14 Pro Max leaves the iPhone XS for dead.
There are new effects like the Bokeh, which blurs the background of portrait photos. And the optical zoom is amazing. I can honestly say that I normally leave my Nikon DSLR camera at home now, and just use the iPhone as the primary camera. Yes, that’s right, the iPhone is all you need for a travel camera and a video camera, particularly if you own the latest iPhone.
How Good is the iPhone Video Camera?
Let me say that I was so excited way back when the GoPro Hero 7 Black came out. The gimbal killer. Finally, I could take great footage walking without having to use a gimbal. The GoPro Hero 7 Black was incredible, every bit as good as the GoPro claims.
Not long after the release of the GoPro Hero 7 Black was released, the iPhone XS Max was released. Let me say that the XS Max image stabilization is also incredible. It is a huge improvement over previous iPhone models.
Take it from me, the iPhone XS Max is also a gimbal killer because there is no longer any need to use a gimbal for smooth iPhone image stabilization. But iPhone video is so advanced now with the flagship iPhone 14 Pro. But how do you compare iPhone cameras from 14 Pro to iPhone 13 to iPhone 12? Rest assured, you could safely use any of these new iPhones as your primary travel camera, or even for pro vlogging!
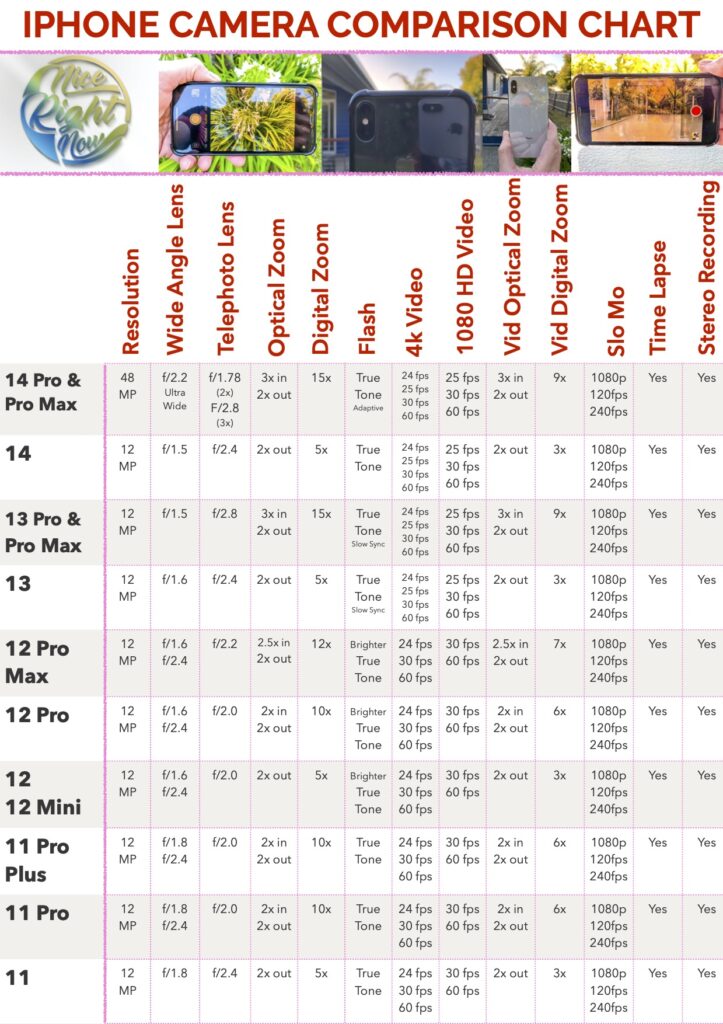
iPhone Camera Comparison Chart 2023
Difference Between iPhone Cameras
So here is a blow-by-blow comparison of the different iPhone cameras, so you can appreciate how they’ve grown over the years. I’ve only gone back to iPhone 7 Plus because let’s face it, anyone serious about photography would own a newer iPhone by now.
Even though iPhones take unbelievable video with great audio, they will be even better with the following recommended equipment. And if you own an older iPhone this is practically mandatory for great-quality video recording.
Tripod
Get yourself a Joby GorillaPod 3K Kit. Not only does this give you perfectly still videos and photos with zero blur, but it also makes for a great hand grip whilst walking around.
Phone Adaptor
You will need a device to attach your iPhone to the tripod. The MeFOTO Smartphone adaptor SideKick360 Plus is a great option because it easily changes from landscape to portrait mode. This is pro-vlogger quality.
External Microphone
The Shure MV88 iOS Digital Stereo Condenser Microphone plugs directly into the lightning port of your iPhone. It gives the best audio of any microphone on the market, is extremely compact, and is easy to change direction.
iPhone Current Prices
Here is the full range of iPhones on Amazon, so you can keep up with the current Apple-certified refurbished price list and compare iPhone cameras by cost.
Compare iPhone Cameras
We trust that you found the iPhone Comparison Chart useful to quickly compare different iPhone Cameras, and learn which iPhone is best for your needs and your budget.
Would you like a free copy of our Ultimate Bucket List?
Not sure where to travel to next? We have created the Ultimate Bucket List to help you plan your next trip. 1170 awesome travel destinations in 167 countries. And we want you to have it for FREE.
When it comes to things to do in Copenhagen, it’s hard to go past a canal cruise from Nyhavn. Here you will see a whole host of historical sights around the canals and harbor without ever leaving your comfortable cruise boat seat!
Note: This post may contain affiliate links. Please read our disclosure policy for more information.
Where to Purchase Tickets
We purchased our tickets on the spot at Nyhavn Canal. In fact there is a handy ticketing booth situated at the end of Nyhavn Canal, where you can purchase tickets on several different cruise lines. For example, we purchased tickets for Copenhagen Canal Tours boats at the ticketing booth, and couldn’t have been happier.
The cost is around DKK 85 per person, which equates to only about $14 for a one-hour cruise. Now that’s a great value!
Ticket Booth at Nyhavn Canal
Naturally, it’s really easy to purchase tickets online at a wide range of websites and platforms. With this in mind, we always go to Getyourguide.com tour booking platform, the most reliable and trustworthy booking platform we have found.
Another option is to use a Copenhagen Card, which has a Canal Cruise from Copenhagen included in the price, as well as loads of other interesting things to do in Copenhagen.
There is a lot to take in during a 1-hour canal cruise. Here’s a list of the main attractions you will see:
Van Straden
Nyhavn Canal
Christianborg Palace
The Old Stock Exchange
Royal Danish Playhouse
The Opera House
The Black Diamond
The Sixtus Battery
The Little Mermaid
The Citadel / Kastellet
Alienborg Palace
Our Saviour’s Church / Christianshavn
The Black Diamond / Royal Library
DAC / BLOX
National Museum of Denmark
The Little Mermaid
Hot Tips for the Canal Tour
Tip 1
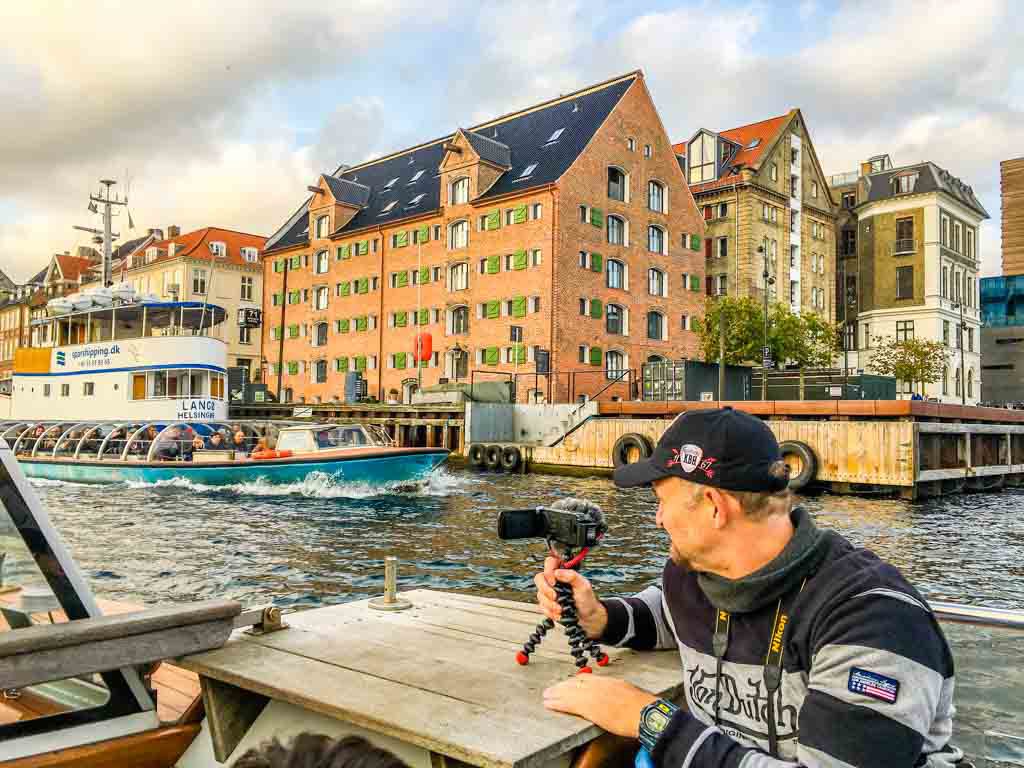
You will see a lot of boats getting around with clear roofs on them. These are great for keeping the cold Scandinavian rain out, but not so great if you want to take great videos or photos. So it’s wise to choose a nice day, and a seat with no roof obstructing the view. That is if you want to take loads of great photos.
Tip 2
You should study the map before going on the cruise, familiarising yourself with the main attractions. Especially as they pass by so fast on the cruise, and if you are not ready you may miss some attractions.
It pays to have a map handy so you can see the attractions coming up. The guide was talking in different languages on our tour and it was not always clear when the main attractions were coming up.
One of the stunning churches
Tip 3
Nyhavn is a spectacularly historic area. Be sure to allow a couple of hours to chill out in this area, either before or after the cruise. And here are 13 amazing facts about Nyhavn to get you started.
Tip 4
Take the canal tour at the start of your Copenhagen vacation. That way when you see some interesting attraction you would like to see up close, you still have time to do so.
Tip 5
Consider combining with a 2 or 3 day hop-on hop-off bus tour. With this in mind there are loads of options available, and this is a great way to cover the entire inner city of Copenhagen.
Tip 6
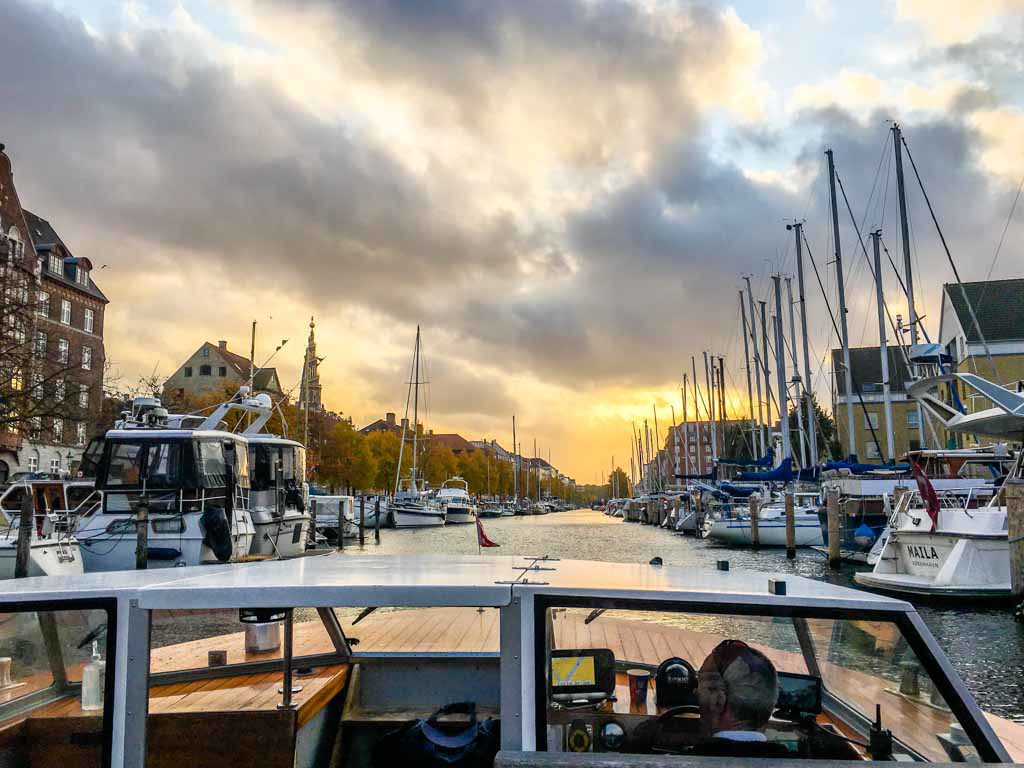
We were very lucky to get a nice day with the sun peeping through, and I’m sure this is very lucky in Copenhagen. If you are lucky enough to see a nice sunny day during your visit then I suggest you use it wisely for your canal tour.
There’s the sun peeping through
Our Review of the Canal Cruise from Nyhavn
There is so much history to pack into a small space of time that it’s hard to fully appreciate it all. And this is mixed with so many modern wonders in this eclectic city. We have been on quite a few 1-hour cruises throughout Europe and this is one of the best, up there with Amsterdam. It is certainly one of the best things to do in Copenhagen!
The best thing about this tour is the price, it is extremely cheap. Not to mention this is such an expensive city where a lot of things are 2 or 3 times what we are used to paying. That makes the canal tour from Nyhavn a must-see attraction when in Copenhagen. Overall we rate this attraction 10 out of 10, don’t miss it.
Would you like a free copy of our Ultimate Bucket List?
Not sure where to travel to next? We have created the Ultimate Bucket List to help you plan your next trip. 1170 awesome travel destinations in 167 countries. And we want you to have it for FREE.
The GoPro Quik App is now officially mind-blowing. The Quik feature will magically sync your GoPro footage and automatically transform them into an awesome video, ready to share your story on social media. To jump on board this phenomenon you need to locate your GoPro wifi default password, and master pairing your GoPro to your phone or tablet.
Note: This post may contain affiliate links. Please read our disclosure policy for more information.
Mastering Your GoPro Wifi Default Password
So why do you need to know how to find/reset your GoPro wifi password anyway? Sometimes you want to pair with your phone to stream media, and something goes wrong. In this case, a password reset might be on the cards.
Even older models can be somewhat more challenging. Read on to find out how to check your connection settings, and how to reset your GoPro wifi password. This is going to help you big time to pair with your mobile device and to connect wirelessly to the amazing GoPro App or Quik app. Check it out.
Note: This post may contain affiliate links. Please read our disclosure policy for more information.
Factory GoPro Wifi Password
GoPro tells us that some cameras are set up with a factory password (“goprohero“). If you own a Hero3 & Hero3+ just enter the GoPro Hero3 default password “goprohero“, and you’re in business.
However, the newer models like my GoPro Hero5, Hero6, Hero7, Hero8, Hero9, Hero10, and Hero11 have a unique wifi password created, for example, band6123.
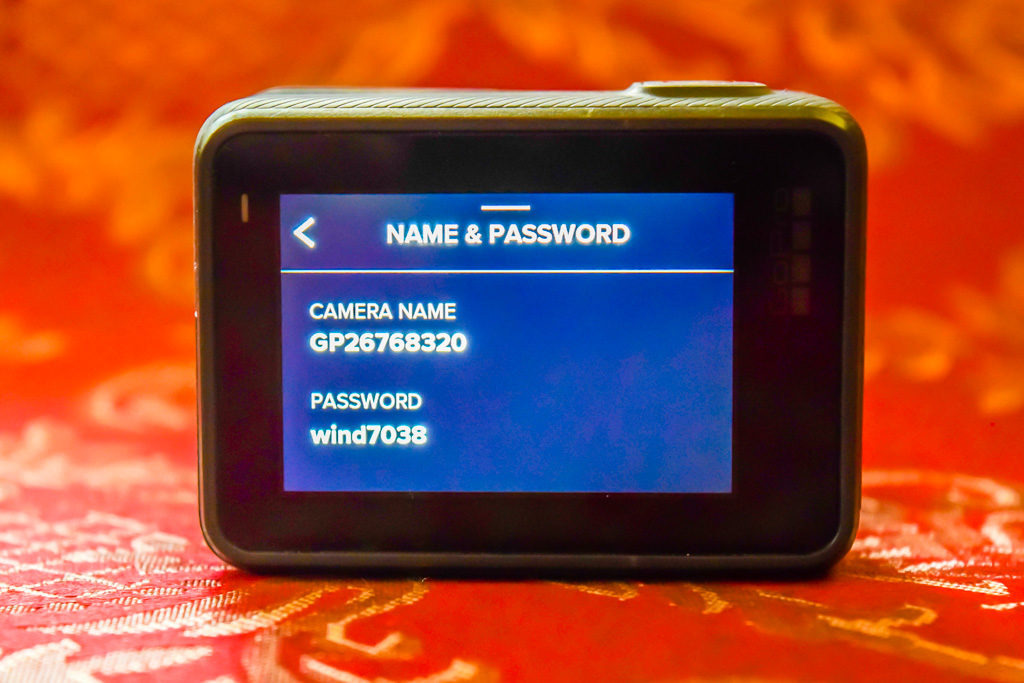
Wifi Default Password screen on GoPro Hero5 Black
For Hero5, Hero6, and Hero7 you can easily find the existing password as follows:
From the main screen swipe down to access the dashboard.
Swipe left to access the Preferences menu.
Tap connect >Camera Information Name & Password.
You will now see a screen with the GoPro CAMERA NAME and PASSWORD displayed.
From the main screen swipe down to access the dashboard.
Tap >Preferences >Wireless Connections >Camera Info.
You will now see a screen with the GoPro CAMERA NAME and PASSWORD displayed.
Changing the Factory GoPro Camera Name
This can be done on certain models. Here’s a summary of the Hero range.
Hero11: You have an option of changing the camera name when you pair it with the GoPro Quik app after you reset the connections.
Hero10: You have an option of changing the camera name when you pair it with the GoPro Quik app after you reset the connections.
Hero9: You have an option of changing the camera name when you pair it with the GoPro Quik app after you reset the connections.
Hero8: You have an option of changing the camera name when you pair it with the GoPro Quik app after you reset the connections.
Hero7: You have an option of changing the camera name when you pair it with the GoPro Quik app after you reset the connections.
Hero6: You have an option of changing the camera name when you pair it with the GoPro Quik app after you reset the connections.
Hero5: You have an option of changing the camera name when you pair it with the GoPro Quik app after you reset the connections.
Hero4: You can change the camera name when you reset the password, see below.
Hero3: You can change the camera name when you reset the password, see below.
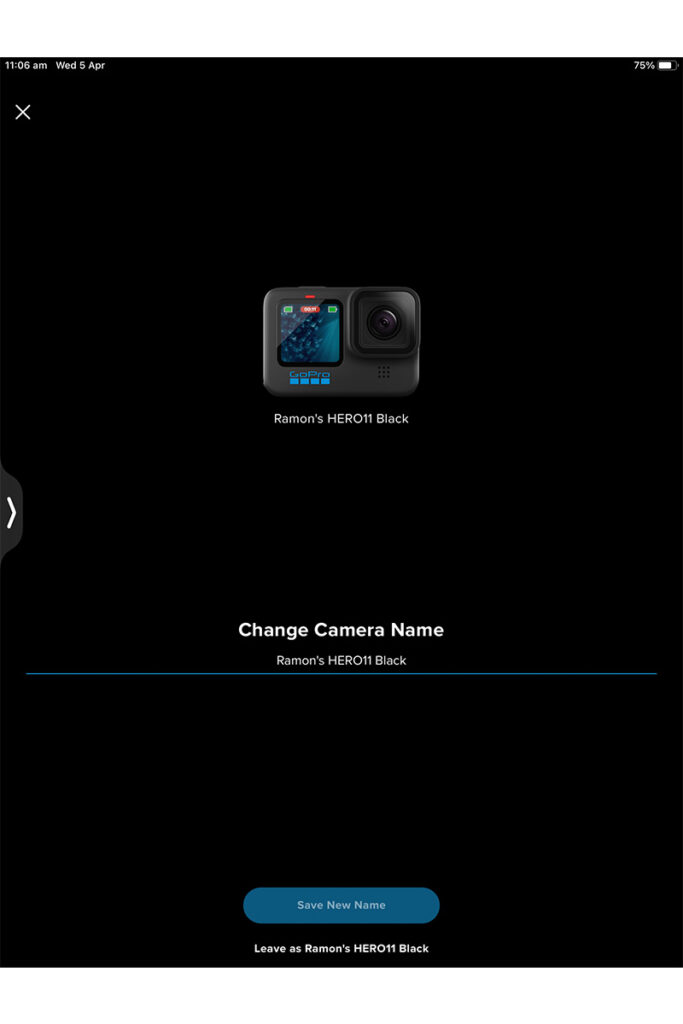
Changing the Camera Name in The GoPro App
How to Change GoPro Camera Name in the GoPro Quik App
In the GoPro Quik App main screen, select GoPro.
Ensure that your camera is connected to the GoPro Quik App.
In the GoPro Quik App GoPro Screen, click the 3 dots in the Camera section of the screen (at the top).
Click Edit Camera Name from the pop-up menu at the bottom of the screen.
Change the Camera Name, then press the “Save New Name” button.
Ways to Reset GoPro Wifi
The Hero5, Hero6, Hero7, Hero8, Hero9, Hero10 and Hero11 are a breeze. Hero4 is more challenging, and Hero3 is unusual. Read on for simple instructions. If your camera is not shown on the below list, here are the GoPro official instructions to reset the wifi password for each different model.
How to Reset GoPro Hero8, Hero9, Hero10, Hero11, Max Wifi Password
Turn the camera on.
On the back of the camera, swipe down to access the main GoPro Dashboard.
On the back of the camera, swipe left to access the Preferences menu.
Select >Preferences >Connections.
Select >Reset Connections.
The GoPro will create a new camera name and password.
How to Reset GoPro Hero7 Wifi Password
Turn the camera on.
On the back of the camera, on the main menu, swipe downwards from the top of the screen.
Select >Preferences >Connections.
Select >Reset Connections.
The GoPro will create a new camera name and password.
How to Reset GoPro Hero6 Wifi Password
Turn the camera on.
On the back of the camera, on the main menu, swipe downwards from the top of the screen.
Select >Connect >Reset Connections.
Select >Reset.
The camera will automatically create a new default GoPro password, but the camera name remains the same.
How to Reset GoPro Hero5 Wifi Password
Turn the camera on.
On the back of the camera, on the main menu, swipe downwards from the top of the screen.
Select >Connect >Reset Connections.
Select >Reset.
The camera will automatically create a new GoPro password, but the camera name remains the same.
How to Reset GoPro Hero4 Wifi Password
Turn the camera on.
Press the settings buttons (side) for 2 seconds. After 2 seconds, a blue Wifi LED light will briefly flash on the front of the camera after 2 seconds. And you will see a wifi symbol on the menu on the front of the camera.
While still pressing the settings button (side), press and release the power/mode button (front).
You see a ‘Reset Wifi Settings’ menu on the front screen. Select Reset by pressing the mode button (front), then shutter button (top).
The camera will turn off for a few seconds, then restart.
You are finished, and you will have a new automatically created GoPro default wifi password.
How to Reset GoPro Hero3 Wifi Password
You need to reset the GoPro Hero3 wifi Password manually online.
On the next page enter the GoPro serial number and email address. Click Next Step.
On the next page, select “Wifi Update Only”. Click Next Step.
On the next page, you get to choose and enter a camera name. You also get to choose the GoPro password for your Hero3.
Save, and you’re finished with your GoPro Hero3 password reset!
Why You Need To Pair Your GoPro With Your Phone
The Main reason to pair your GoPro is to access the great GoPro app. Overall pairing is quite a simple process, and you probably won’t even need to enter your wifi password. I did not need to enter a password at all to pair an iPhone with Apple IOS 11 and a GoPro Hero5 Black.
Official instructions on how to pair your GoPro to your phone can be found HERE.
There are other devices that you can connect with via wifi as well, namely a Smart Remote or a Remo (Voice Remote). Or you may have the awesome Volta battery hand grip and tripod, which can also function as a remote control,
The Amazing GoPro Quik App
I definitely recommend you pair your GoPro with the GoPro Quik App (formerly named Capture). I’ve used plenty of apps produced by other camera companies, and the GoPro Quik App is by far the smoothest I have seen. Altogether the app has some really neat features, no doubt each person will favor different features. And it’s perfect for your travel videos, and it’s ideal for quickly creating reels or shorts.
In fact of all the ways to update your GoPro firmware, the GoPro Quik App is definitely the easiest. I particularly like the easy viewing of camera videos, updating Protune settings, the Quik Studio feature, and of course the firmware upgrade.
In summary, make sure you try pairing your GoPro to your smartphone or tablet to open up a whole new world of functionality. By and large the GoPro Hero5, Hero6, Hero7, Hero8, Hero9, Hero10 and Hero11 are very slick action cameras with a seamless interface to the awesome GoPro Quik app. Also pairing with your phone is a breeze, and the wifi is very easy to check or change.
Quik was one of the main marketing drives of the flagship GoPro Hero 6 Black, and the “next big thing” with GoPro. You really owe it to yourself to master your GoPro wifi default password settings and get on board this awesome pairing of your GoPro to Quik. Your Facebook and Instagram live community will thank you later.
How Much Do GoPro’s Cost?
Sooner or later you may like to compare prices, and specifications, or even purchase a GoPro. With this in mind, here are some Amazon links that help you make a quick comparison.
Flagship Models
High End
Entry Level
Resetting GoPro Wifi Password Like A Pro
Resetting the GoPro Wifi password is easy when you know how. And it seems to get easier with each model. Now go out and have fun with your GoPro 🙂
Would you like a free copy of our Ultimate Bucket List?
Not sure where to travel to next? We have created the Ultimate Bucket List to help you plan your next trip. 1170 awesome travel destinations in 167 countries. And we want you to have it for FREE.
Have you ever considered using your GoPro for travel videos? It’s small, super high tech and amazingly versatile. I’m here to tell you that it’s phenomenal, and is one of the best compact travel cameras money can buy.
Note: This post may contain affiliate links. Please read our disclosure policy for more information.
Why Choose a GoPro for Travel Videos?
Firstly, let’s have a look at the four main categories of travel cameras:
1. Smartphones.
Let’s face it; smartphones are incredible cameras these days, especially the newer iPhones. Not only do they take amazing still shots, but the video is also incredible.
And it’s 4K. But the price of a decent smartphone has become very hefty. It’s not the sort of camera you would want to take snorkeling, it’s just too fragile and expensive.
And the accessories you can buy for smartphones are relatively limited when it comes to taking video. Sure you can buy nice gimbals, tripods, or microphones, but there is nowhere near the range of accessories for smartphones, as there is for the GoPro.
2. Compact Cameras
These are great little cameras, actual point-and-shoot. Just put these cameras in auto mode, and start videoing. It couldn’t be easier. Just let the camera do all of the thinking for you.
If you want the best budget travel camera, you can find countless options in the compact camera range. But you do get what you pay for. Meaning you do have to shell out some serious coin to get an epic compact camera, especially for video.
Although there are a few compact cameras on the market that take superb quality video, mostly the features aim at regular photography.
3. DSLR Cameras
You can shoot outstanding video with DSLR cameras; however, these cameras can be quite expensive. Especially if you’re a more advanced photographer, and start going for different lens configurations.
Most DSLRs have even fewer video options than compact cameras. And you need a full-size tripod or monopod to mount your DSLR on, for they are not easy to hold for video. After all, DSLRs are not designed to be video cameras.
Overall, DSLRs are great for vlogging-style videos, but not entirely practical for travel videos. Mainly due to their large size and lack of video settings.
4. Action Cameras
It’s easy to pick up a cheap action camera; there are plenty less expensive than GoPros. However, GoPros are the most reliable, the most technologically advanced, and have the best range of accessories.
Not only is GoPro the smallest and most versatile of all travel cameras but they are also supported by some incredible smartphone apps. These apps make GoPro travel videos more effortless than ever to produce.
Let me start by saying that I usually travel with three different cameras.
DSLR for Regular Photography
Although iPhones are now remarkably close to DSLR-quality photos, you still can’t beat a DSLR for professional-quality photography. That’s because you get full control over your photo settings with a DSLR.
Pictures are more of an art form, not just point-and-shoot. And your optical zoom options are only limited by what you are prepared to spend on lenses.
As for my Nikon D5300, a beginner’s DSLR camera, it’s not that heavy or bulky. D5300 is suitable for traveling, especially since I take a single multi-purpose lens (AFS Nikkor 18-55mm 1:3.5-5.6 GII). This lens gets about three times the optical zoom, which is generally enough for travel photography.
Note that there is so many great mirrorlesses (compact) cameras on the market these days, that you could quite easily substitute your DSLR for a compact camera. It’s all up to your personal preference. For example, the Nikon AW130 is a rugged little compact camera. Not only is it shockproof, but it takes a fantastic underwater video.
iPhone for Incognito Photography
iPhone is a no-brainer because I bring my iPhone practically everywhere I go. These days, who doesn’t? iPhones are great for taking inconspicuous photos.
You can wander through the crowds without showing any visible camera gear, and whip out the iPhone anytime for a great photo. iPhone is super handy when you don’t want to stand out from the crowd as a tourist.
GoPro Hero11 Black for Video
The GoPro Hero7 was my preferred travel camera for taking videos since 2018. But then came the GoPro Hero11 Black, and it was time to upgrade. These days I even use the GoPro Hero11 Black to take high-definition still images using GoPro, mainly because I am now able to replicate the quality of an iPhone or DSLR.
The GoPro video quality is outstanding. And the versatility is second to none. You need to decide what style of filming you want to do on the day and pack appropriate GoPro accessories.
Is the GoPro Shockproof? GoPro doesn’t advertise the Hero series as shockproof cameras. However, I dropped mine a couple of meters, and it survived.
In comparison, I lost my nice Sony Cybershot camera from just 1 meter high, and it died instantly. I’m not too keen on dropping my iPhone or DSLR either.
Different Options for Using GoPro as a Travel Camera.
So here are a few different options and GoPro accessory combinations I like to use when I’m using a GoPro for Travel Videos.
All of the below accessories are compatible with the four best GoPro Cameras, the GoPro Hero5, GoPro Hero6, GoPro Hero7, and GoPro Hero8. All accessories require “The Case”, which comes with the new GoPro camera.
Using a GoPro at the Beach
GoPros are ideal at the beach and in saltwater. It is wise to rinse them thoroughly after the beach trip, as well as any accessories. The best GoPro accessories for a beach holiday are the ones that won’t be bothered by sand and saltwater.
GoPro 3-Way Grip – extends to 20 inches / 51 cm, terrific for underwater footage.
GoPros are fantastic for filming epic sunsets, or exciting cityscapes. All you need are some essential accessories. One will be sufficient. A good tripod and I do recommend the best on the market.
GoPro Volta – An awesome Tripod and long-life battery all in one, perfect for time-lapse photography!
Best GoPro Accessories for Kayaking
Kayaking is a blast with a GoPro, especially if you have a head strap. The GoPro is strapped firmly to your head for some perfect first-person travel video. And the best thing is that kayaking is a reasonably stable pursuit, so your footage should come out great.
Bodhi Floaty Case – floating case Orange for GoPro HERO 6, HERO 5 Black
Although GoPro has some terrific onboard stabilization, it’s a good idea to pack a gimbal for extra video stabilization. That is unless you have the gimbal killer (GoPro Hero7), with its hyper-smooth video stabilization. Nowadays the GoPro Hero11 Black with HyperSmooth 5.0 video stabilization is unbeatable.
For my GoPro Hero5, I like to use a Feiyu G5 gimbal; these are cheap and extremely easy to use. However, for the GoPro Hero7 Black, no gimbal is necessary, thanks to the Ultra Smooth image stabilization. Note that I still use the Feiyutech Gimbal to supplement the built-in Ultra smooth stabilization of the Hero7. The result is… better than ultra-smooth.
One thing with GoPro (and with all other video cameras I’ve tested) is that the audio quality of the inbuilt microphone is not that great. If you want to capture some genuinely professional audio, you must use an external microphone.
Fitting an external microphone is not so easy with GoPro, but it is possible. In this case, it is best not to use a gimbal, as the external microphone will upset the delicate balance of the gimbal.
I like to go for the best, the Rode microphone range. The Rode VideoMicro is a terrific little microphone, and it’s almost wire-free because it’s mounted right near the camera.
If you’re lucky enough to own a GoPro Hero8, Hero9, Hero10 or Hero11 you’re in luck! Because you can get the media mod, which is a case with a built-in directional microphone facing forwards and backward. And the media mods allow you to add extras like large Screen Mod, Lighting Mod, etc. using 2 clever cold shoe mounting brackets. No more messy cables are needed. Brilliant!
The technological advancement in the GoPro camera is incredible. Like the iPhone is to the phone world, the GoPro is a game-changer in the action camera world. Technology is one of the reasons that traveling with a GoPro makes such good sense. You are packing a state-of-the-art camera.
GoPro took a giant leap when they updated from the GoPro Hero4 to the GoPro Hero5. They became fully waterproof, without the need for an external case. That’s enough to make the GoPro one of the best compact travel cameras on the market.
The other thing with the GoPro Hero5 is that it changed the form factor from the GoPro Hero4. The batteries and external case for the Hero4 no longer fit the Hero5.
But the good news is that GoPro Hero5, Hero6,Hero7, and Hero8 all keep the same form factor, so everything is interchangeable. Including batteries. Either of these three cameras is the best camera model for your holiday; it just depends on your budget.
The GoPro Hero 7 and Hero 8 are by far the best GoPro for traveling because they have vastly superior image stabilization over their predecessors. Stabilisation is what sets it apart from every other video camera on the market. But don’t worry, GoPro Hero5 and Hero6 are still perfect for use as your travel video camera.
The thing I really love about the Hero 7 is the voice control and Voice on Wake feature. You can ask your GoPro to turn on, how cool is that? And the Hero 11 has 7 different ways to turn it on, and another 7 ways to turn it off. How versatile is that?
It is time for me to get with the program. I’m talking about GoPro Hero9. Interchangeable lens, hyper smooth 3.0, more pixels, better slo-mo, and more screens. What’s not to love about Hero9?
What About the GoPro Session?
I have never owned a GoPro Hero5 Session because I think it’s vital to have an onboard LCD in your travel camera. It is a mandatory requirement to adjust settings and check the footage. For this reason, the Session is not as useful as a GoPro Hero5, 6, or 7 as your travel camera; I don’t recommend it.
Recommended GoPro Accessories for Travel
There are so many GoPro accessories on the market that it can be challenging to know which ones to bring on your holidays. Here is my recommended GoPro accessories list.
It’s broken up into two parts: 1) essentials to bring on every trip, and 2) optional. The final choice, of course, depends on the style of video you want to capture.
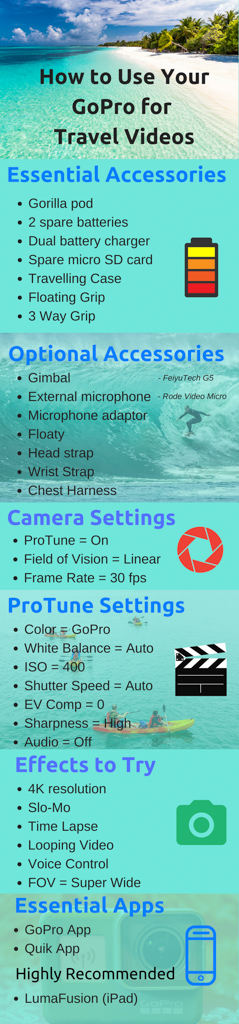
1) Essential GoPro Accessories for Travel
GoPro Creator Edition
I love the GoPro Creator Edition. You get a GoPro Hero11 Black, Volta battery hand grip, light mod, SD card and maybe a couple of other accessories. The GoPro Hero 11 Ultra Smooth Stablalisation is so good that you no longer need any other form of stabalisation. This is pretty much the centre piece of my travel vlogging rig and I love it.
GoPro Hero5, Hero6 or Hero7
Honestly, any of these will models will do. You will get superior results with the later models, but any of these will give you great results.
The main point to note is that in-built image stabilization improves with each model, and this is one of the essential features for travel videos. Being an action camera, GoPro has made incredible advancements in this area.
The Hero7 is so good that they call it hyper-smooth, and a gimbal killer. That is to say; you don’t need a gimbal for stable video if you own a GoPro Hero7. Sounds enticing right?
If you decide to use your GoPro as your primary travel camera, you must have enough power to get you through an entire day. There is nothing more frustrating than getting to the highlight of your day, and then running out of camera power. Yes, GoPro batteries go flat quickly.
I recommend taking two spare batteries; in fact, I always carry three spare. You will find that three extra batteries are a good match for a 32Gb SD memory card because you will probably fill up your SD card just as you run out of batteries. That is if you’re taking 1080P and 30fps video.
How to charge a GoPro
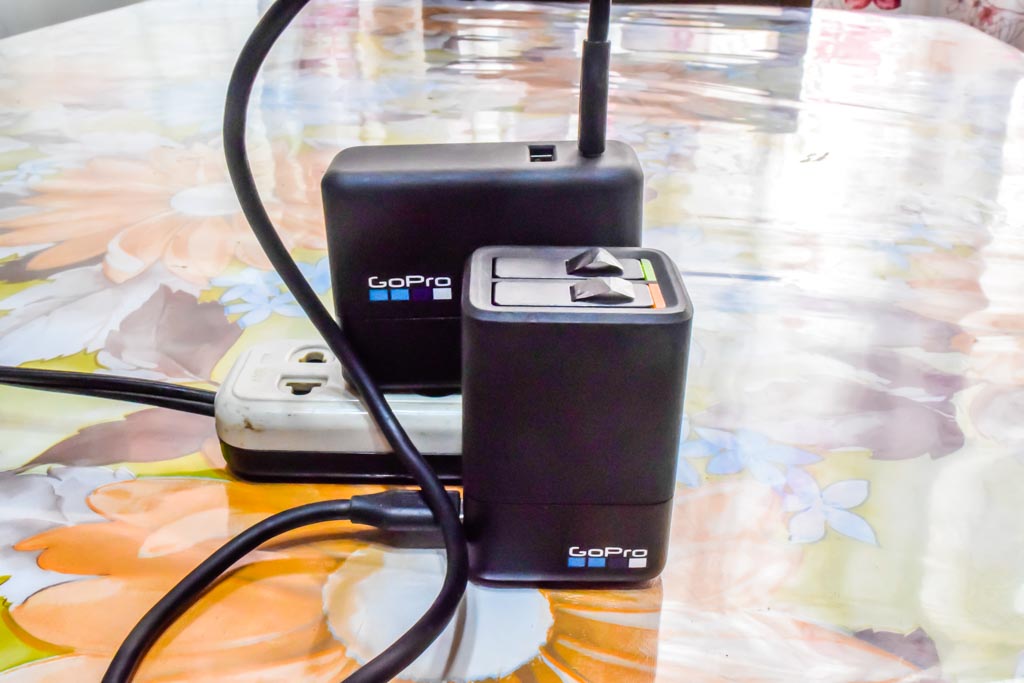
Battery Charger
The dual battery charger from GoPro should be part of your traveling kit. It is remarkably versatile and charges two batteries to full in about 2 hours. And you can plug it straight into your iPhone wall charger.
Indeed, you can easily purchase SD cards with massive capacity these days. 128Gb is not that expensive anymore and is more than enough to last for a few days.
However, I have had a couple of camera SD cards fail on me in the past. It would incredibly be frustrating to travel to some stunning location with your GoPro and find your 128Gb SD card has a catastrophic failure. It happens. No SD would render your amazing GoPro utterly useless.
Be smart and pack a spare micro SD card in your traveling kit. I use a 128 God bless SD card with a couple of spare 32Gb Sandisk micro SD Cards. 32Gb is enough for a massive day of GoPro filming, and it will consume 3 or 4 of your batteries to fill the card.
The Case
The Case is the name given to the plastic enclosure that your GoPro sits inside. It is essential for attaching your GoPro to other accessories. The only accessory I have that works without the case is a gimbal. Never leave home without The Case.
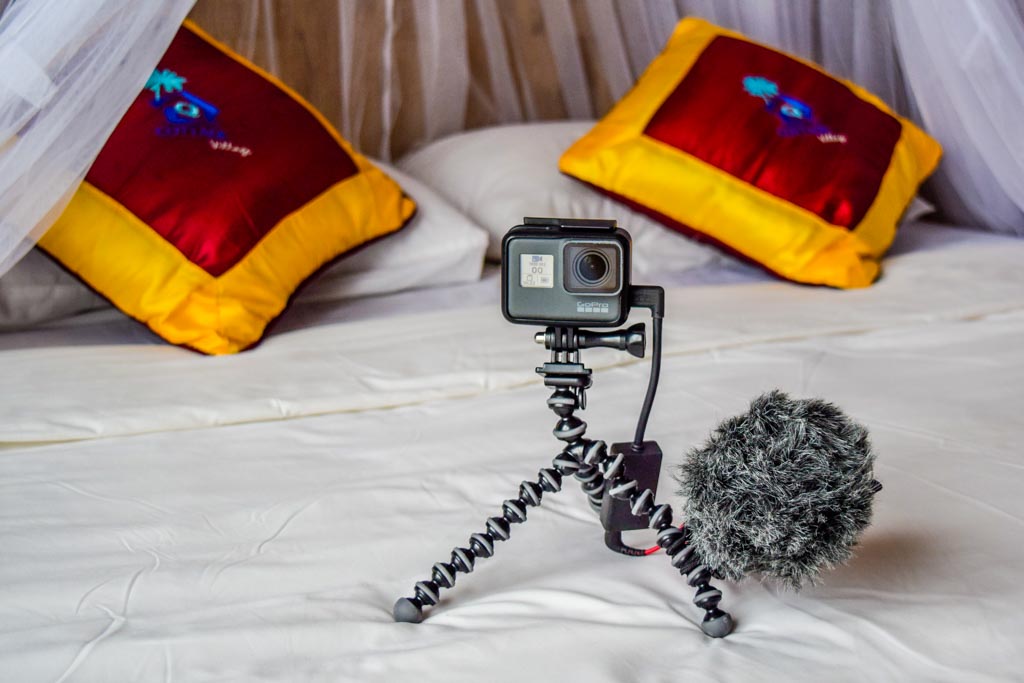
Gorilla Pod
The humble GorillaPod is a remarkable invention. It doubles up as both a tripod to stabilize your camera and a versatile grip to hold onto your GoPro. It is also a selfie stick! And it is useful for attaching an external microphone.
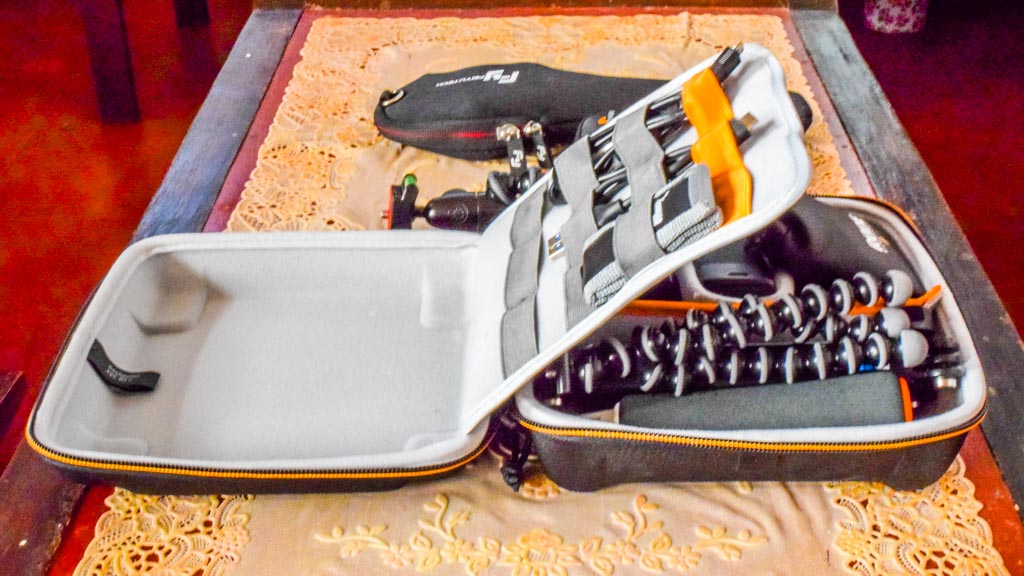
Travelling Case
All these GoPro travel accessories don’t come cheap, once you add them all up. So you don’t want them bouncing around the bottom of your backpack, getting damaged or lost. So a quality travel case is an essential part of your GoPro travel kit.
GoPro makes a great case called “The Casey” which is a nice compact size and should fit most if not all of your accessories. I also like the LowePro cases; they have a vast range of different sizes to suit any size travel video kit. I particularly like the Lowepro Dashpoint AVC 80.
The versatile Lowepro cases
2) Optional GoPro Accessories for Travel
FeiyuTech G5 V2 Gimbal
For me, this is an essential GoPro travel accessory if you own a GoPro Hero5 or Hero6. Perhaps not if you own a Hero7, a.k.a. The gimbal killer.
If you try walking with a GoPro without a gimbal, the inbuilt image stabilization helps a little to steady your footage. But the walking motion still does horrible things to your footage. A quality gimbal can help you to make walking videos a reasonable quality.
And by the way, it doesn’t have to be a FeiyuTech G5 V2 gimbal. Feiyutech is the one I used with my GoPro Hero5, and I love it. It’s lightweight, splashproof, and easy to operate. But there are many other gimbals on the market that will probably do just as good a job.
Rode External Microphone
Like all compact travel cameras, the GoPro sound quality is not so good using the inbuilt microphones. There are times when you want to get top-quality audio, especially if you plan to use your GoPro for Vlogging.
If you do use an external microphone, this is one area you don’t want to skimp. The pros usually use Rode microphones, because they are very affordable and give you professional quality.
There is a wide range of great options available from Rode, but the most suitable for GoPro travel videos is the Rode VideoMicro. This can quickly mount right onto your grip using a hair tie. Be sure to get a dead cat with your Rode VideoMicro. These are the grey fuzzy attachments that reduce wind noise.
You could also go for the Rode SmartLav+ lapel microphone. That is, if you want to hear more of yourself talking, and less of the surrounding sounds.
Aftermarket adaptors are challenging to find, so I recommend going straight for the genuine GoPro adaptor. You will most likely need to shop online to find one.
Gorilla Pod and Rode VideoMicro and GoPro adaptor, with Hero5 Black
This genuine microphone adaptor works as a treat, but it comes with two significant limitations.
This will make you GoPro non-waterproof. That’s because you have to remove a waterproof cover to plug the adapter. Once you remove the adaptor, you can re-fit the waterproof cover and your GoPro is watertight again.
The cable hanging out the side of your GoPro makes it practically impossible to use with a gimbal. I’m sure somebody out there has found a solution, but I have yet to solve this puzzle.
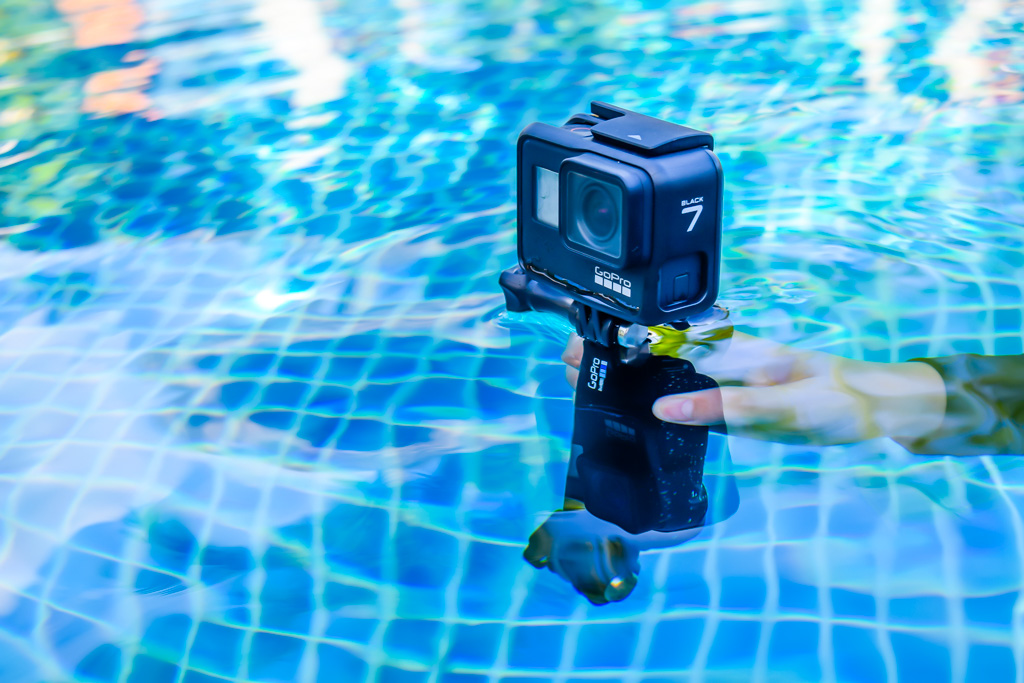
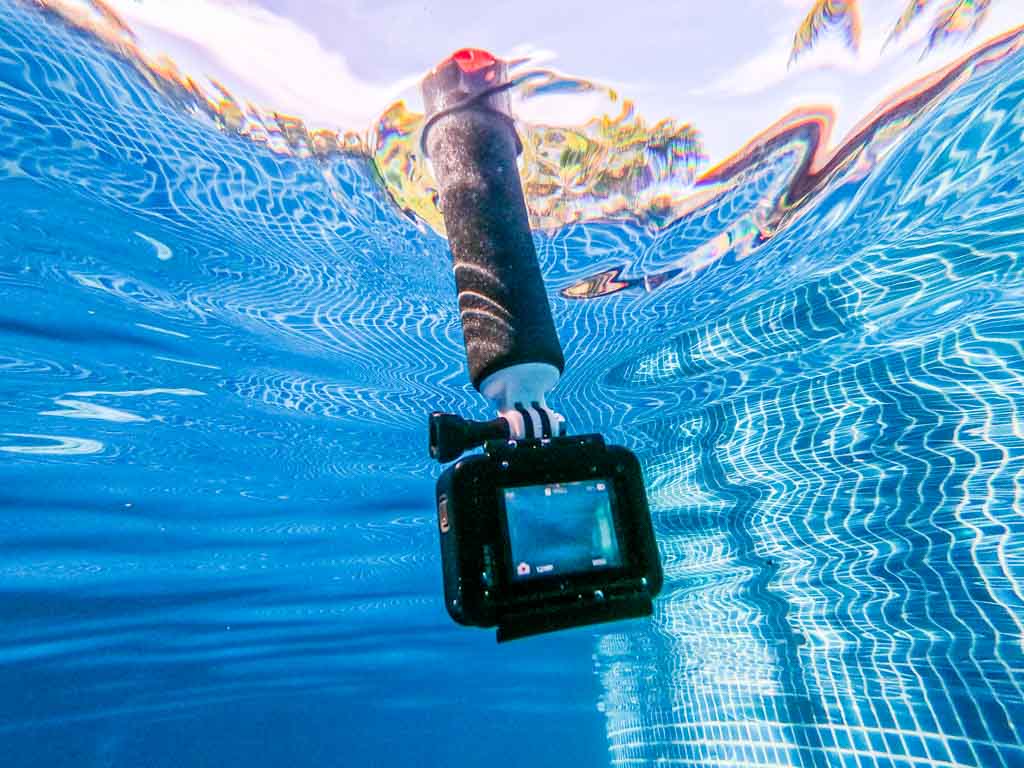
Floaty
The Floaty is a rubbery case you put around your GoPro. It’s a valuable accessory for the beach because it floats. Your GoPro does not float, in case you were wondering. But of course GoPros are waterproof, here’s a useful guide to finding out just how waterproof different models are.
The Floaty will stop your camera from sinking
So if you drop your camera in the water, it’s going to end up in Davy Jones’ Locker. That’s at the bottom of the ocean, in case you were wondering. That’s why it’s essential to attach a floating accessory like the Floaty to your GoPro, so it does not sink to the bottom.
GoPro Body Mounts
You can attach a GoPro to virtually any part of your body, using cleverly designed attachments. GoPro has a wide range of genuine accessories, and there are lots more aftermarket attachments available. There are three body attachments that I recommend for your holidays:
Wrist strap – great for snorkeling (and a wide range of other fun activities)
Head strap – perfect for kayaking or cycling (and a wide range of other fun activities)
The GoPro Hero is thetechnological marvel of the action camera world. It has so many fresh options jam-packed into this tiny camera that you will probably never use them all. Here are the most useful GoPro features for your travels.
Protune
Protune is an outstanding feature introduced way back on the GoPro Hero4 in 2014. The Protune feature allows you to update all advanced camera controls quickly and easily. This includes Color, ISO Limit, Sharpness and Exposure.
GoPro video stabilization is probably the most useful of all GoPro features. This takes your shaky footage and stabilizes it so that you can have a nice smooth travel video.
GoPro is world-famous for being the leader in this technology, and it’s one of the main reasons this camera makes the best travel video camera.
4K Resolution
Most people will say that 4K resolution is not necessary for shooting regular travel videos. I disagree. That’s because 4K can also be used as a zoom feature on your video editing software.
Let me explain more. Pretend you’re shooting a video of something far away, like a yacht on the ocean. If you record in 4K, then you can zoom in closer using your editing software, and still maintain your nice High Definition 1080 resolution.
Time Lapse
Time Lapse is an excellent feature to help you capture a completely different perspective of some location. You can video at a much slower frame rate than usual, so when you watch the video at average speed, it appears much faster.
For example, a nice 1-hour sunset is compressed into a 2-minute video. Or a busy city scene can be recorded in time-lapse to transform your GoPro travel video into something special.
To take top-quality GoPro time-lapse video, all you need is a decent tripod. A GorillaPod is perfect.
Slo-Mo
The opposite of time-lapse, slo-mo makes your video appear much slower. Once again, Slo-mo can add a completely different feel to your travel video. And it is remarkably simple to use on GoPro cameras.
Looping
One of the lesser-known features of GoPro cameras is the GoPro looping video feature. In looping mode, when your GoPro SD Card runs out of space, it will overwrite the video at the start of the SD card so you can continue recording.
This allows you to keep filming for as long as you want to catch a special moment. For example, you are capturing the exact moment that a fish takes your bait.
The camera will keep looping over itself, so you don’t end up with miles of useless footage. All you need is a simple tripod like the GorillaPod.
Voice Control
Another elegant feature is that the GoPro has full voice control. You can ask your GoPro to start recording, stop recording, and loads of other commands. This is great on your surfboard, your helmet, or some other difficult-to-access position.
Frames Rate or Frames Per Second
This is how many frames per second you view when replaying the video. 24fps gives you the authentic cinematic look, and 30fps is the standard video look. If you want a stunning video that pops, go for 60fps and 4k resolution.
GoPro can take you up to a crazy 240 fps at 1080 resolution. This gives you the ability to slow down your footage to super slow-mo using video editing software. The frame rate is super easy to control, especially on the GoPro Hero5 and later.
Field of Vision
Field of Vision allows you to film Super Wide for a fisheye effect, or linear for the standard look. Linear is what you usually get on other ‘normal’ video cameras. On the GoPro, there are several Field of Vision settings to choose from, and it’s super easy to change on the fly.
GoPro Apps
One of the best things about GoPros is the fantastic apps that support GoPro cameras. These apps make traveling with GoPro cameras even more inviting. Here’s a summary of the two leading GoPro apps:
GoPro App (formerly Capture)
Your GoPro can synchronize with your phone over Wi-Fi to automatically upload your video footage into the GoPro app. This is useful to view your footage on a bigger screen, and also to commence the editing process.
The GoPro App also gives full control over all the main camera settings. This allows you to use your smartphone as a high-tech remote control for your GoPro.
The remote control feature is great if you’re using your GoPro as a vlogging camera, or if you have your GoPro mounted somewhere out of arm’s reach. That’s because you start and stop recording using your phone as a remote control. How cool is that!
This is one of my favorite GoPro features. All you need to do is synchronize your GoPro to your phone via Wi-Fi, and you’re away!
Quik – GoPro Video Editor
The GoPro App can transfer your footage into a second app called Quik, and automatically create videos for you. The range of themes is vast and satisfying, giving remarkably different looks to each video. This is an excellent feature for uploading to Instagram Stories, IGTV, Facebook, or wherever else you want to share your content.
The best thing about Quik Video Editor is that you hardly have to do anything. This is the most advanced, and most fun mobile video editing app you will find. And it’s exclusive to GoPro. It’s even available on a desktop, for free!
Travel Video Workflow
So you’ve gone to all the trouble of shooting some great holiday videos using your GoPro. Now, what’s a good workflow for producing your videos? Here’s a quick overview of a workflow that works for me.
Decide What Style of Video to Record
You need to know what style of video you will be recording on the day so that you can pack the appropriate GoPro accessories. For example, do you need a GorillaPod or a gimbal?
Do you need to bring an external microphone, or rely on the GoPro onboard microphone? Do you need to attach the camera to your body? Do you need your GoPro to float in water?
Capture Your Video Footage
Just be sure to carry spare batteries and an extra SD card. And your GoPro action camera.
Upload Video to Photos
I usually use an iPad Pro 10.5 inch 512 GB as my video editing machine while traveling. After a day of capturing videos, I’ll download the entire SD card into the Photos app via the iPad. This requires an Apple “dongle”, otherwise known as a lightning to SD card adaptor.
Alternatively, you could download straight to a laptop, or an external hard drive, or even synchronize wirelessly into the GoPro app.
Copy to iCloud Files App
I prefer to work in the Apple iCloud Files app. That’s because it is much easier to import into video editing software from this app or to export to some other backup medium.
After copying all the video files into the iCloud Files app, I then delete them from the Photos App. This is because a large volume of video data will often delay synchronizing photos between my Apple devices. To prevent delays, I remove the video files from the Photos app altogether.
Import Into LumaFusion App
My preferred mobile video editing app is LumaFusion. This is a powerful app that allows multitrack editing on an iPad. You quickly add music, titles, transition, and pure color grading. It’s enormously more powerful than iMovie, although LumaFusion does cost more.
You could import to another iPad video editing app; there are so many great apps to choose. Or you could go straight to a desktop app like Final Cut Pro X for even more powerful editing.
Export Produced Video
The final step is to produce the last video. These should be at least 1080 resolution to future-proof them. I like to upload my created video files into cloud storage, and also a couple of backup hard drives.
From there, you’re able to watch the final video on TV, share it on social media, or post it to YouTube. Time to look for the next travel adventure to capture on video!
How Will Use Your GoPro on Your Holidays?
I have just scratched the surface of the versatility of the world’s best action camera. You really should take a GoPro on your next travel adventure, and see what fantastic video you can share. The sky is not the limit with GoPros, there are no limits to what you can do.
More Reading
Here are some more great GoPro Articles to get you started:
Go Pro Cameras have 3 basic modes – Video, Photo, and Time Lapse. But did you know there are actually 20 GoPro modes to choose from? In this article, we show you the full list of 20 Unique GoPro Camera Modes to choose from.
What do the 3 Camera Modes Do?
Let’s start by looking at the 3 main modes and what they actually do.
Video Mode – Records 5.3K video at 30 frames per second with the Wide digital lens. Includes onscreen shortcuts that make it easy to swap digital lenses and shoot slo-mo footage.
Photo Mode – Takes 27MP photos in the 8:7 aspect ratio with the Wide digital lens. Includes onscreen shortcuts for changing digital lenses and setting the photo timer.
Time Lapse Mode – Captures 4K TimeWarp footage with the Wide digital lens. Includes onscreen shortcuts for changing digital lenses and Speed Ramp.
How to Switch Between Camera Modes
There are 5 different ways you can switch between Video, Photo, and Time Warp Modes, read this article to learn all of those ways.
The most common ways to Switch Modes are:
Whenever the GoPro rear screen is showing a live view, you can swipe left or right to switch between Video, Photo, and Time Lapse modes.
With the camera on, you can press the Mode button (on the side of the camera body) to switch modes.
3 Different Video Modes
There are 3 different video modes to choose from, to help you optimize video performance depending on how you use the camera. You can access the 3 video modes as follows:
Swipe down on the rear screen to access the Dashboard.
Swipe left and tap to toggle between modes.
The 3 different Video Modes are as follows:
Highest Quality – The highest quality video resolutions and frame rates to capture the best-looking footage possible.
Extended Battery – Mid-range quality resolutions and frame rates to help you capture stunning quality footage while extending your battery life.
Longest Battery – Standard quality video resolutions and frame rates to help you capture good-looking footage while providing the longest battery life possible.
Personally, I always use the highest-quality video mode.
14 Different Capture Modes
In addition to the Camera Modes and Video Modes, there are 14 different Capture Modes to choose from. These are also referred to as Presets. These are fully customizable (refer to our article: Best GoPro Settings for Hero11 Black).
Video Presets
Standard – For regular Vlogging type video eg. Travel Vlog.
Full Frame – Uses the 8:7 aspect ratio, so you can later crop to vertical or horizontal, virtually any aspect ratio. But it uses stacks of memory space.
Activity – For sports, fast action, and lots of movement.
Cinematic – For those Academy Award movie-style videos.
Slo-Mo – For capturing Slow Motion videos.
Photo Presets
Photo – For capturing regular photos.
Burst – Captures a series of photos at blistering rates, up to 30 photos per second. Great for fast-action shots.
Night – Automatically adjusts the shutter speed to let in more light, perfect for dim or dark photos. Requires a tripod or mount.
Time Lapse Presets
Time Warp – Captures ultra-smooth time-lapse video whilst you are moving.
Star Trails – Video the sky, using the earth’s rotation to capture beautiful trails of light across the sky. Requires a tripod or mount.
Light Painting – Uses long exposure to create brilliant brush effects with moving light. Works well with torches or light sticks to create designs. Requires a tripod or mount.
Vehicle Light Trails – Point your camera towards moving vehicles to capture stunning light trail footage of the vehicle lights. Requires a tripod or mount.
Time Lapse – Great for sunsets, records time-lapse photography when your camera is still. Requires a tripod or mount.
Night Lapse – Captures time-lapse video in low light or dark conditions. Adjusts the shutter to let in more light, requires a tripod or mount.
To activate presets, click the large oval settings button at the bottom of the screen.
Setting Your Default Preset
You can choose which preset will be loaded when you turn on your camera by following these steps:
Swipe down on the rear screen to access the Dashboard.
Swipe left and tap Preferences > General > Default Preset.
The Most Versatile Camera Modes
Once again GoPro shows that it is the most versatile action camera, by giving us such a large range of options to optimize our videos and photos. We hope you can get out and find a use for a few of these 20 GoPro Camera modes, to get the very best from your GoPro.